Friday, 24 March 2017

BUILDING AN ACCESSIBLE HOUSE - THE BUILD CONTINUES - Week 7 Update


Hi everyone

I bet you've all been wondering how this build has been going and I have been meaning to update the blog with where its at right now.  Well we have a Roof! So thats a start.  Its also been waterproof wrapped as we now head into Autumn, so even though its not weather-tight quite yet its still keeping the recent rain off the framing and most of the interior.  Next week the Brick exterior cladding starts, the windows are due, and we are also about to spend time with the electrician deciding on the lights, light switches and power points etc.  I will update a bit more on that further in the blog but first lets do a photo timeline update so you can all go OOH & AAH at it 😀

Photo Timeline

Week One

Week One - Day One - Excavation Starts

Week One - Day 5 - the rib raft floor starts

Week Two 

Week Two - Day 1 - the rib raft framing is down
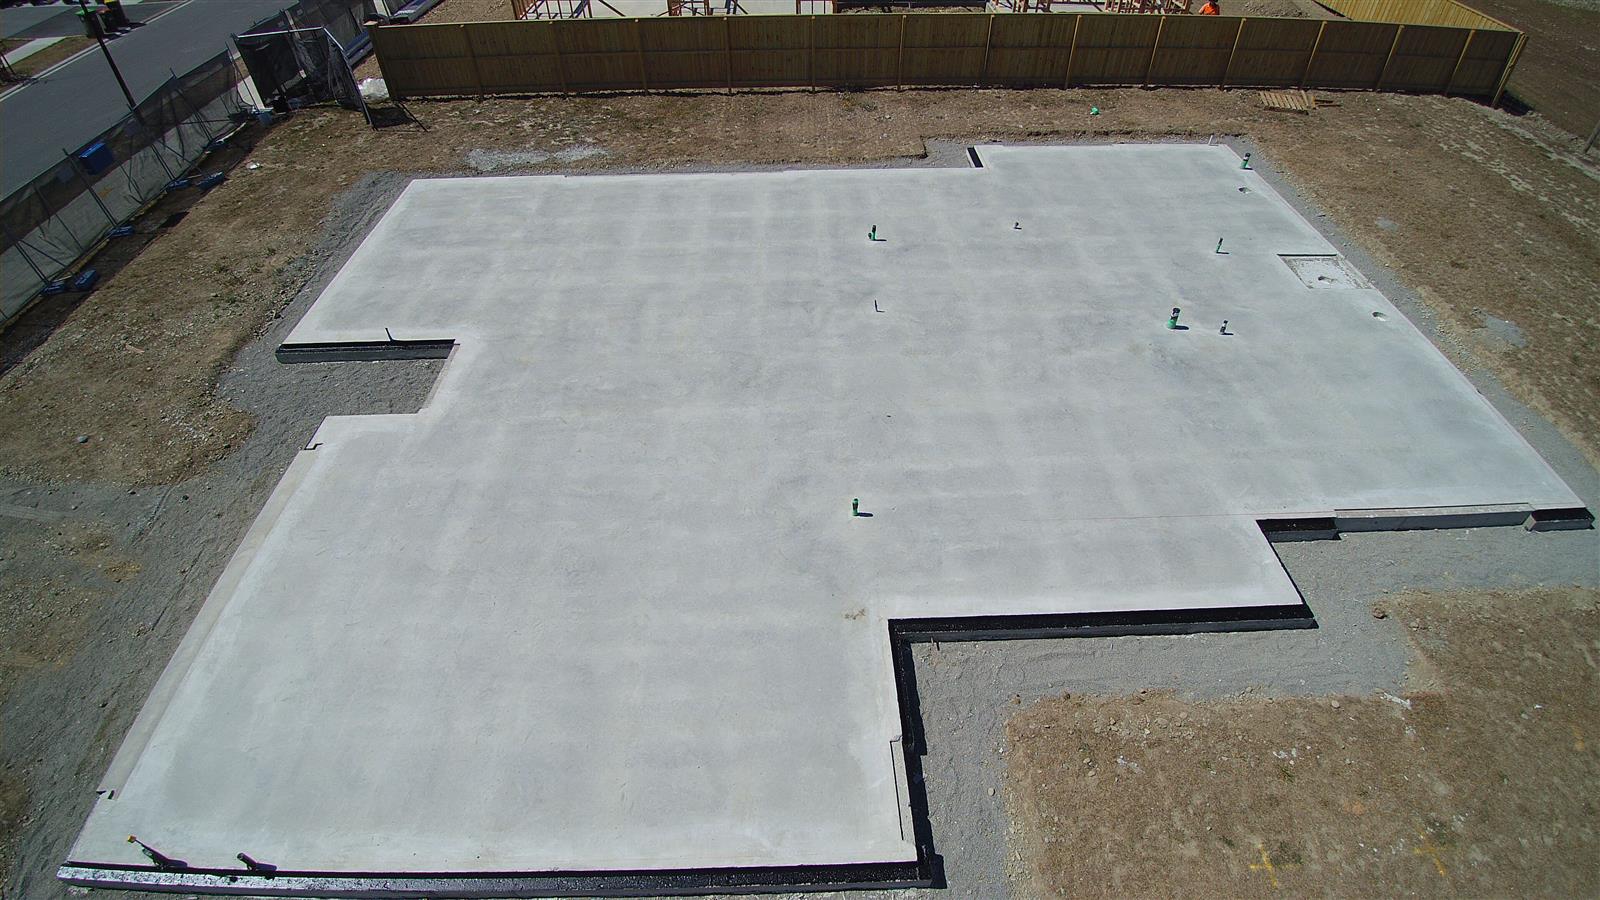
Week two - Day 3 - the Concrete Slab is done

Week Three

The framing begins:

And Aerial shot taken by our builder showing the frame - it looks so like the plans!

Week Four

Looking at the spot the large sliding doors will go (this is the side of the house)

Looking at the front of the house the lounge windows to the left and the front entrance in the middle


Week Five 

An Aerial view of the trusses for the roof

The scaffolding is up and the roof goes on soon

The front of the house is now starting to look like a house

Week Six 

The roof is done! The waterproof wrap is being done and the
scaffolding will come down soon

Week 6 - Day 5 - the framing for the gib is already
 going into the garage - soon they will start to line the interior


Whats due next?

Well its Autumn here and the weather is starting to settle in so its great that they got the roof on when the weather was better and they will have a more or less dry area to work in.  In the next few weeks they will be pre-wiring the house, starting to put up the battens for the gib (drywall), reinforcing the walls where we want shelving or things hanging from the wall like rails, and obviously the exterior starts to come together.

LifeMark Accessibility and the Electrical Walkthrough

So next week we have the Electrical walkthrough with the Electrician to work out where lights will go, power outlets, heated towel rails and other items.  So the Husband has spent time going through our LifeMark assessment to make sure we have it all in hand and can spend time explaining to the Electrician just WHERE things can go.  

The guidelines are quite specific. For a start, plugs can't be put within 30 cm of the floor. For 'bonus points' plugs should be at a consistent height between 50 and 120 cm from the floor, and for even more points plugs should not be within 50 cm of an internal corner.

Humm... Keeping plugs out of the corners should be fairly easy, but having them all at mid-thigh height in all rooms will be be challenging,

One thing the Husband is keen on is recessed low-intensity lighting in the hall - like what you have on stairs - with the reasoning that we are often up in the night to check in on the boy. The number and placing of these lights has become a bit contentious.  He also worried about the power they would use for awhile - the LED lights are rated at 1W, but the driver losses need to be taken into account. Two 1W lights for 12 hours a day, for a month is about  1kWhr - or 20c of power. per month. Less than a cent a day to not stumble round in the dark every night is well worth while.

Talking of lighting, the location of light switches is also specified in the standard. They should be at the same height as the door handles, Must make sure that the electrician and builder agree about the handle height. We also need to have light-switches at both ends of the corridors, its giving us a small problem as we have three doors entering the end of the hall, so do not have a clear wall space to place the switch on! 

We also discussed including some hard-wired panel heater, which seem like a good idea as they will be low-profile and not obstruct moving a wheelchair around, and avoid having cables over the floor. The downside is we will need to know where the furniture will be to avoid having a heater where we will want to place the bed. It is a tough call, as we tend to have a heater on overnight during winter to help avoid winter snuffles and chills. Not having these also avoids having to decide what wattage heater to install. So a compromise might be to install an extra power point where we might want to hard-wire a heater once we get settled in. 

There is always so much to think about with these things its easy to get overwhelmed!  One thing I still wish we'd considered was removing the wardrobe doors and turning the wardrobe into a recess we can use for 'parking' equipment.  Other families have chosen to do that and it makes sense to have the wheelchair, walker and maybe the standing frame somewhere out of the way.  Of course we are also in the middle of teaching the young man to self transfer to his wheelchair, his walker and possibly the bed.  All this means that the equipment needs to be within easy reach.  No doubt as the house progresses we'll have a clearer idea of all that.

We'll try to update again as the build progresses, thanks for stopping by to view our blog!

Vivien

Sunday, 19 February 2017

BUILDING AN ACCESSIBLE HOUSE - THE BUILD BEGINS

Week one, day one - time to excavate the section


Hello and welcome to 2017!

Well we should probably have had an update on all the goings on and hiccups that have transpired since my last post about our new Accessible Home here in Canterbury, New Zealand. But life and Summer Holidays got in the way.  However since the resource consent came through a few weeks ago our build has now started! So we can now update the process as we go along.


Lifemark Update:

We got confirmation at the end of last year that our design and build earned a Provisional 5-Star Lifemark assessment which was both exciting and empowering.  We now know that our design should allow our son to live there happily and grow up without any further adaptations on the house or a new house being built to accommodate him in the future (unless he wants to move out and live independantly from us).
Over the summer our currently 9 year old wheelchair and sometimes walking frame boy grew and is rapidly outgrowing everything, his wheelchair, our car, his bed, his clothing, and in some respects our house! Its almost like this house can't come along fast enough despite the bittersweet regret of losing our little slice of paradise here in rural Canterbury.  So we have had to go through the process of requesting a new wheelchair, a car modification (or if necessary a new van with hoist), a hospital bed, and lots of other new equipment.  Its obvious hes not a little boy anymore but will soon be 10 years old.

Week One of the build and already they have the rib-raft base down

Too late for cold feet:

So our building company confirmed about 10 days ago that the new build was starting and emailed a login to their project management software online.  We popped around late in the afternoon of the first day to see progress on the section and instantly thought "Oh dear look at how small that section is".  We currently live on a section that is 2000sqm+ and this new section is 768sqm so you can see why yes, it is a lot smaller.  That is part of our decision, to down size the section so we can spend less time trying to keep the land from turning into a wilderness and more time giving our son the best life possible.  This house is designed to do that, to alleviate all the space issues, the ability to turn in the corridor, or walk past him in the kitchen, and a better flow and layout for all of us and especially our wheelchair user.  But, as you might imagine after spending 15 years living in a rural town with a large beautiful established garden there is a sense of regret and what might have been, just more realization of what we are leaving behind and all the memories we have made here.
Summer is also giving way to Autumn here so we also feel sad that this is the last summer we will ever spend in this place.  With these feelings is also the building excitement that in almost 5 months time we will be moving into a new purpose built house in a suburban environment within walking distance of schools, parks and the local Aquatic Centre (our favourite weekend space).
School started for the year two weeks ago too so life has quickly got busy and so far we haven't had too much time to even realise the big event ahead of us.  Life, appointments, school commitments, work and day to day events mean some days you forget that they are building a new house for us 8 minutes drive away.  

The New House Begins...

Week Two - Day 1 - Plumbing Services in - reinforcing mesh on

Its now the second week of the build and already the rib-raft slab is 80% complete and when we visited today the reinforcing mesh is on and plumbing for all the sinks, baths, and toilets etc was clearly visable.  It won't be long until the concrete is down and the framing starts.  The project management software is showing the end date of the build to be the end June so we now have an idea of just how quickly this house will be built! This year our son turns 10 years old at the end of July and we can't help but feel thats when we'll be moving into the new house, and what a birthday present that will be!

But does our son really want this change?

Something has been happening to our little man since we started visiting the building site, he often gets teary, clingy and a little upset.  He is non-verbal and talks with an ipad AAC software (see previous blog posts about that) so its often hard for us to understand just WHY hes upset.  He just is.  Often when we discuss the house and moving he gets teary.  We're starting to suspect hes not keen on the move and is starting to get upset at the thought of it.  We will have to sit down with him and try and discuss it with him and with luck he will tell us if this whole process is scaring him and leading to these unhappy moments.  Its going to be a big overwhelming experience for us all and is guaranteed to cause serious upheaval so this is not unexpected.  Just being gentle and calm with him and talk about it as positively as we can we're hoping will bring him around.

More to come...

So keep stopping by the blog and see how our build is going we expect to post more photos and updates as it progresses.

Vivien

Monday, 19 December 2016

Accessible House Update and Christmas Treat Toppers - FREE PRINTABLE


Hi All and Merry Christmas from all of us!

ACCESSIBLE HOUSE - An Update


Thank you to all those that have visited our blog and followed our somewhat disjointed story via this blog.  I will update on the Accessible Home as we progress, but suffice to say its now with the Council awaiting approval of the plans.  We have also started the LifeMark Certification of the house to make sure both ourselves and the Building Company we engaged keep to the Accessibility plans for the house.  One thing that has come out of the process so far is that if anyone asks me of a recommendation for building companies or building an accessible home I would say to ask the company this (not the salesman because they will tell you ANYTHING to get a sale) and when I say ASK the Company I mean ask the Management of the Company whether that be the CEO or whomever is closest to the top.  Ask them "HAS YOUR COMPANY EVER BUILT AN ACCESSIBLE HOME BEFORE?" if they say "YES" then ask: "HOW MANY HAVE YOU ACTUALLY BUILT?" I would then go on to ask them details of how they built it, what level of disability the customer had etc.  It doesn't have to go into personal details its just so you can gauge their level of expertise and UNDERSTANDING.  Its really stood out to us these past few months that the general mobile population seems to think those with limited mobility are probably Old People and their perception is skewed coupled with a innocent ignorance of the way those of us with a disabled person in our care live our lives.  I am sure we didn't get a lot of things right and we'll figure that out once we live in the place.  Its hard having a child that is both mobile and requires a wheelchair to get around.  Its hard trying to meet both needs and often we aren't sure what the future holds for us.
One of the many iterations of the kitchen design
Recently we've started the process for a new bed, a new van (with wheelchair hoist), a new wheelchair, hoists, the housing team to go over the new build and lots of other adaptations.  This is because next year our son turns 10 and he is growing and getting TALL and HEAVY! But mostly its so we can work on HIS independence and so we can bring in Carers and Buddies to help him live his life in the best way he can.  2017 is shaping up to be an interesting year with lots of new adventures for us all.


But onto Christmas and what we've been doing lately...

CHRISTMAS GOODIES

With a new home looming the finances are a bit tight so we opted to make homemade goodies for our friends and family as gifts.  It was also something our son loves to do, COOKING!
So we have been busily making our famed Creamy Fudge recipe that we have been asked to make for the last few Christmases.With that is each year we try different ways of packaging them.  Last year I think I made Origami Boxes using Scrapbooking Paper.  This year I went for Cellophane bags and Treat Toppers.  If you google or Pinterest Treat Toppers you'll find all sorts out there, some good, some a bit...well... different and not my cup of tea, and then there are plenty you can pay for...either way it was just a little too MUCH to wade through and find just THE one so instead I got busy with the Desktop Publishing Software (PagePlus Starter - I've mentioned it in previous blog entries) and made a topper of my own.  So I thought I would share it with you here:
(requires a Google DRIVE login to open and Adobe Viewer to View)


So Print them out on A4 Paper with your printer, Cut out each one and fold in half then place over the top of your Sellotaped down Cellophane Bag and staple in place (like I have here):


We shoved lots of Christmas Shortbread , the fudge and intend to make White Chocolate Chip and Cranberry Cookies as well then put them all into Tins to take to our friends.


Thanks for Reading our blog and ENJOY!


Wednesday, 5 October 2016

DRAFT-A-LONG - Drafting a Boys Tshirt

Hi All!

I have decided to practice my new skill of pattern drafting and thought others may find it of use too.  There is plenty of tutorials out there that show you how to draft a pattern from a favourite well fitting tshirt.  But my tutorial is a little different.  Its how to draft a Tshirt using a template of measurements.  This tutorial shows you how to draft a Size 134cm (8-10 years) Boys loose fit tshirt with short sleeves.  I intend to follow up this post with a how to sew and how to adapt the pattern as time allows.  But if you ever wanted to make your son a tshirt and wanted a free pattern well try this!

What you'll need:


  • Paper - quite a wide piece you can use lunchwrap like I did or A3 sketch paper or you could use a piece of newspaper or even sellotape together a bunch of printer paper - your choice! It just needs to be wide enough and long enough.
  • A long ruler - I used a 40cm long clear ruler but you may need to have a measuring tape for the longer measurements 
  • Pen or Pencils - to sketch the lines - up to you if you use different colours for the lines and markers

A Drafting we will go:


Step 1:   

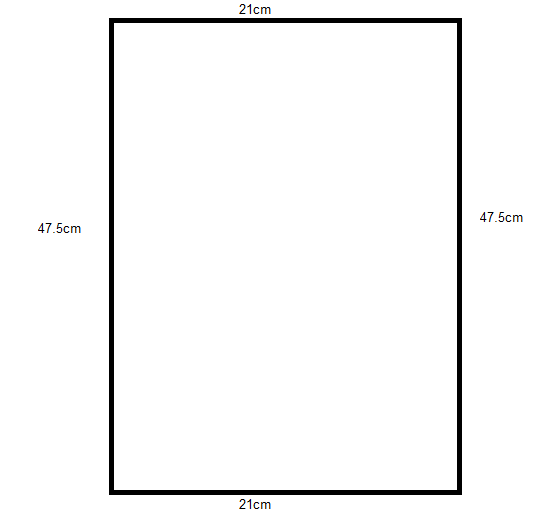
Draw a rectangle on your paper similar to the one in the picture.  Measure 21cm across the top, 47.5cm down one side and the other and close the rectangle with another 21cm line.


Step 2: 

Following the diagram make markers along the top line at 4cm, 9.5cm from the left corner and at 6.5cm and 2cm from the right hand corner.  Down the left hand side make a marker at 2cm, 7.5cm, and 20cm.  On the right hand side place markers at 3cm and 20cm.  Join the two 20cm markers with a line across the rectangle.

Step 3: 

Using the same diagram measure across from the left hand 7.5cm marker measure across a line 9.5cm long and from the top 9.5cm marker measure a 7.5cm line that joins to the previous line.  This will be the rectangle that helps you make the curve for the front neckline. 

Step 4: 

Draw a curve like the one shown in the diagram from the left hand 7.5cm marker to the 9.5cm marker on the top line.  The lines you drew in step 3 should assist you in making the curve.  From the 6.5cm marker on the top line measure down 1.5cm and place a marker.  At the 2cm marker on the top line measure down 3cm and place a marker.  Measure across from the right hand lines 12cm marker and put in a marker.  At the 20cm line measure across 2cm and put a marker draw a line that intersects all those markers from the top line to the 20cm line (the green line in the diagram).  At the 12cm+2cm marker measure across a further 2cm and place a marker.  Using the top 2cm marker the line you drew down and the 2cm marker you just made draw a curve that goes from the 2cm marker to the 20cm marker bending in to meet the 12cm+2cm marker as in the diagram.  In order to make the shoulder line measure across from the left hand top 9.5cm marker down towards the right hand 2cm marker but angled down 2cm insersecting the 1.5cm measurement measured down from the top lines 6.5cm marker.  

Step 5: 

For the final curve (the back neckline) you need to measure down 2cm from the top lines 4cm marker.  Join with a curve the left hand sides 2cm marker and the top lines 9.5cm marker curving under the 2cm marker you just made at 4cm.  Mark the left hand line with "FOLD" this will be the centre fold line when you cut the pattern out.  
Finishing off!

To finish off you can retrace the pattern to make a back and front pattern or when you cut out the pattern just trim off to the lower neckline for the front.

You have now drafted a front and back Tshirt pattern!  This pattern (without the sleeves - which will be in another post) can be used to sew up a singlet for your young man as well.  Stay tuned for Part two - drafting a short sleeve for your tshirt.

thanks for reading my tutorial/DRAFT-A-LONG!

Vivien


Tuesday, 20 September 2016

Building an Accessible Home - an update

Hi All

Well its been a full on bunch of weeks deciding on fittings and hard flooring etc.  This will just be a quick update with a warning that when working with Building Companies be sure you ALL understand the requirements.  That what YOU are expecting matches what they are doing.  We have had a hiccup as we proceed with this which has just been a miscommunication.  We wrote on our list of requirements 'Extra Wide Doorways', we suspect we said what width that was (910mm) but as there is a Government Accessibility code that states doorways need to be at least 810mm wide (the door size) the Building Company Designers have innocently taken that Code as the means by which they are designing our house.  So rather than take our requirements they have assumed that we want to follow the "Code" and have designed based on that.
Our assumption was they were following our requirements rather than the code so we never took note before signing of the apparent differences.
So our suggestion would be if there are important features that are non-negotiable (like doorway widths) that you are VERY sure what they are going to be, and that there is an agreement in writing or at least a specified size written on the contract before you sign or pay for it.  Alas in our case nothing was written so we are hopeful they will understand our stance on the extra wide hallways and doors and make the change without too much cost to the overall plan.


If you are interested in the Government Accessibility code and perhaps designing a compliant 5 star home yourselves you can easily look it up here:


You can check out there Pinterest recommendations here:


thanks everyone and keep posted for the next few updates.  I am intending to blog about our choices and design.  We let our son choose the vinyl planking for the main living zone and I would have to say that kid has taste!

Vivien

Building an Accessible Home - an update

Hi All

Well its been a full on bunch of weeks deciding on fittings and hard flooring etc.  This will just be a quick update with a warning that when working with Building Companies be sure you ALL understand the requirements.  That what YOU are expecting matches what they are doing.  We have had a hiccup as we proceed with this which has just been a miscommunication.  We wrote on our list of requirements 'Extra Wide Doorways', we suspect we said what width that was (910mm) but as there is a Government Accessibility code that states doorways need to be at least 810mm wide (the door size) the Building Company Designers have innocently taken that Code as the means by which they are designing our house.  So rather than take our requirements they have assumed that we want to follow the "Code" and have designed based on that.
Our assumption was they were following our requirements rather than the code so we never took note before signing of the apparent differences.
So our suggestion would be if there are important features that are non-negotiable (like doorway widths) that you are VERY sure what they are going to be, and that there is an agreement in writing or at least a specified size written on the contract before you sign or pay for it.  Alas in our case nothing was written so we are hopeful they will understand our stance on the extra wide hallways and doors and make the change without too much cost to the overall plan.


If you are interested in the Government Accessibility code and perhaps designing a compliant 5 star home yourselves you can easily look it up here:


You can check out there Pinterest recommendations here:


thanks everyone and keep posted for the next few updates.  I am intending to blog about our choices and design.  We let our son choose the vinyl planking for the main living zone and I would have to say that kid has taste!

Vivien

Wednesday, 7 September 2016

Building an Accessible Home


Its been some time since my last bunch of blog entries and plenty has gone on since then.  I hope you have been enjoying my sewing tutorials and history of AAC progress! In the past year (where did 2016 go?) we have been realising that our current house doesn't work for a now 9 year old son in a wheelchair.  So what to do?  Well we shopped around for bigger houses, with large sections, or a purpose built house with enough open plan features that we could modify it to work for us.  In the end we brought a section and have now set about building an accessible home for us all.  Its been a long process and its only just starting.

Our current house in Springston on a cold morning

So our intention is to post blog updates on our progress, so if you too are thinking of building an accessible home you can see our thought processes and how we went about building our place.

Our original rough design done with Room Sketcher software

So what are we building?

Well we opted for a smaller section, its going to be hard leaving behind our semi-rural 1/2 acre in a rural town to move to the suburbs, but we have chosen to do that so we are closer to his schools, the hydrotherapy pool and so we have a property we can manage.  The reality is that as our son gets bigger he gets heavier and there is only so much energy in a day you can expend without being physically exhausted.  So managing a large garden isn't one I could keep up not without employing a full time carer for our son.  

One of the many variations - this one we almost went with

Open plan rocks!

Yes thats what we discovered, turning circles for wheelchairs, negotiating hallways, doorways and right angles were becoming a mission.  Inside our house now we were running out of space, in varying places and varying times we have had LOTS of equipment cluttering up the place.  Walkers, standing frames, wheelchair, buggy, bikes, tables, toys, bathing chairs you name it.  We even had a hoist but returned it as there really wasn't room for it.  We have separate rooms for everything with a long hallway linking everything.  Its been Ok but now our sons wheelchair is getting bigger along with him.  One bonus is that hes started to walk with his anterior walker but still needs full assistance to do cornering or moving on carpet.  So we have decided the main living area needs to be simple, open plan and have large turning circles.  
Our son also has separation anxiety when we aren't within his view most of the time, some days hes totally Ok in a room on his own as long as he knows your close. But other days hes prone to being very distressed if you're not within view.  So open plan it is.


Our inspirations

What was important?

Well that was what we realised we had to get to so that we didn't break the budget.  We realised we needed to stay in our current place until the very last minute and servicing a large mortgage was going to be hard work.  So there wasn't going to be the option of selling our place, moving somewhere and renting while the house was built, or even staying in a caravan on the land.  Nope, we had to stick to a modest budget and tighten the finances.  So inevitably our 'wish list' had to whittle down to what was REALLY important?
  • Open plan living, dining and kitchen
  • Wide doorways, hallways and entrance
  • No real right angle turns, good flow between spaces
  • Decent sized bedrooms, especially for our son
  • A wetroom bathroom fully accessible from our sons room 
  • Good hard landscaping outside for his wheelchair
  • Level entry decks and ramps so he could go outside easily
  • Large garage to accommodate a van with hoist (able to be opened with garage door closed)
  • A private space for our son as he gets older
  • A private space for us and our own bathroom
  • A workspace for myself so I can continue my Special Needs Clothing business from home
A very early design of the property - this is the landscaping plan,
ultimately this was just too expensive but we would have loved it!

What ended up staying on the list?

Most of it actually, my workspace is now taking the spare bedroom and visitors may end up sleeping in the lounge LOL.  Unfortunately we just couldn't afford the 4th bedroom so we could have a storage space for equipment and visitors if they came to stay.  I needed my workshop so again the 3rd bedroom will be primarily my workshop but with an option of a bed in there if we have people to stay over.  We also had to opt for a concrete patio out from our sons room and we will have to provide the ramping ourselves into his room.  As I have threshold ramps already I didn't think that would be too hard.  We have a fully removable ramp fully funded for our current house and can approach the fund-holders about relocating that to the new house if necessary.  


Time to start the house!

So that's where we're at now...the designing of the house has been done, the money has changed hands, and we now start the designing of the fitout, choose the flooring, the colours, the bathroom, then await the foundations being built.
Right now I am going to meetings with suppliers confirming things and soon I will be posting more blog updates of progress so keep checking in and seeing how we're going.  I will endeavour to explain our reasoning for varying features as the house build starts in earnest.


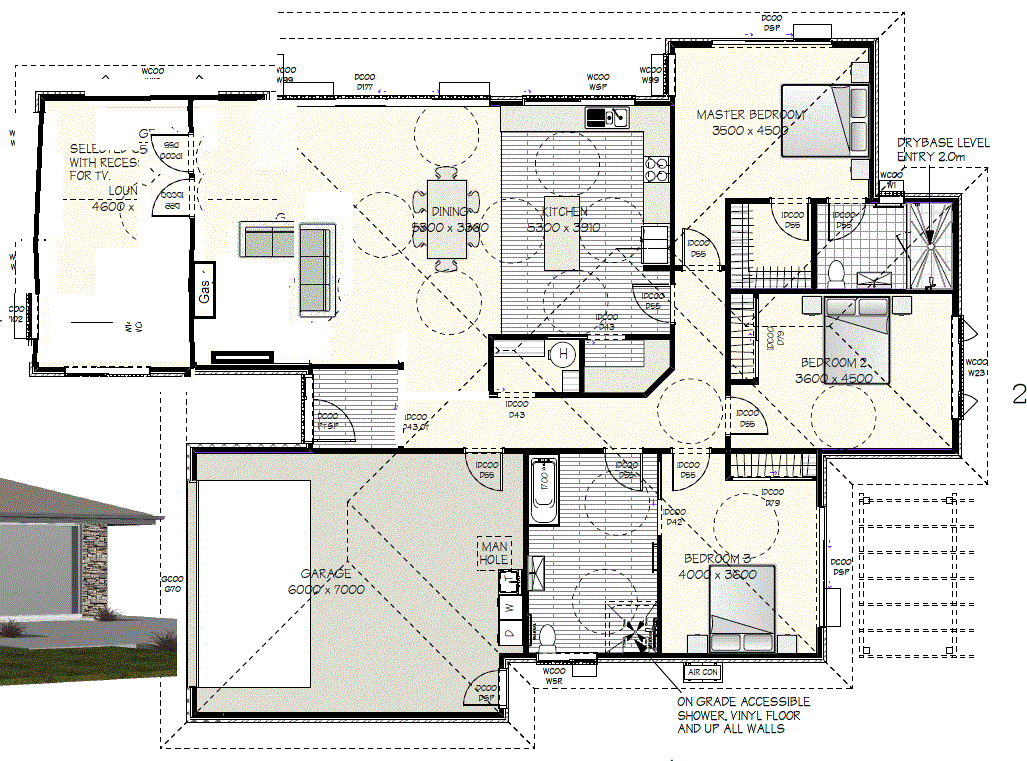
Here is the final elevation and plans - it all looks a bit different in black and white.  

Tuesday, 10 November 2015

Tutorial - Adding Pockets to the Oliver+S Sunny Day Shorts Pattern


I wanted to make up the free 'Sunny Day Shorts' Pattern by Oliver & S but felt it needed some pockets so I decided to modify the pattern & make a tutorial for you all to see how it's done!

Instructions:

What You'll Need

- the pdf of the pattern printed out & sellotaped together (see link above)
- some tracing paper to trace the size you want onto
- felt or marker pens to draw your pattern
- Sellotape if required
- about 40-50cm X 120cm cotton fabric (I used drill)
- pins
- sewing machine
- thread
- 20mm wide elastic (about 60cm)

Tracing your pattern:

Select your size from the printed Sunny Shorts PDF & trace off all pieces in the size you want.

Adding pockets to the traced pattern:

Using just the traced front of the shorts pattern draw a curved line from the shorts pattern top & the side seam. I didn't really measure it I just 'guessed' how long & wide I wanted it. The first curve will be the pocket opening. Slightly away from that curve draw another curve in the shape of a pocket. My rule of thumb was to make it about 5cm away from the first curve at the top. The square grid on the Oliver&S pattern helps to give you a general size. (See the photo for how I did it)

From the traced pattern piece trace the pocket piece only, for the facing draw from the side seam across & down the second curve & back to the side seam. For the pocket pouch trace around the first curve (pocket opening) & across & down the second curve to the side seam. (See photo for pieces)

Cutting out your shorts:


Pin all your pieces to the fabric ensuring you cut out 2 pocket pouches & 2 pocket facings. For the front slash lines to the first curve & fold the piece back so you're able to cut the curve as part of the front. (See photo)

Sewing the shorts:

Pin the pocket pouch to the front shorts piece, matching curved edges right side to right side.  Pin and stitch

Turn out and iron flat.  Top stitch curved edge about 1/2cm away from the edge.


Place the front on the pocket facing piece matching the pocket pouch and pocket facing right sides together. (see photo) pin pocket facing and pocket pouch along outer edge and stitch.

Lay front and pocket flat, pin top of pockets and front at upper edge and side of pockets at side seam.  Baste in place.

Pin & stitch front and back together at side seams as mentioned in the Oliver+S instructions, catching in the pocket sides (you should have this happen easily if you basted as I said in the step above).

Continue following the instructions in the Oliver+S pattern instructions.  You should then end up with a completed shorts and be ready to do the waistband!

Continue to follow the instructions as mentioned in the pattern ensuring you catch the top of the pockets into the waistband (the basting should help) and you should have it looking like the below photo:

Follow the instructions for the waistband and you should have a completed pair of shorts with pockets like mine below!  Hope this helps you to modify the Oliver+S Sunny Day Shorts Pattern.


These are a great easy pair of shorts that fit really well and you can easily whip up lots of them.  If you aren't keen on doing the whole inset pockets like my instructions you could instead make patch pockets using a similar method or extending the shorts leg length and adding side pockets.  If you want me to make up a tutorial for those two options just ask!

Happy Sewing

Vivien