Showing posts with label clothing. Show all posts

Thursday, 6 November 2025

Adapted Sewing Patterns Coming SOON

 Sew your own zipback shortie romper


Something exciting is coming to

Picklefish NZ!


We're going to start offering our own Adaptive Sewing Patterns for purchase and digital download so you TOO can sew for your loved ones.

If you have LOVED our products and you can sew then these will be for you!

You can now sew your own Picklefish products. If you have already downloaded and used our FREE Bandana Bib pattern then you will be excited to see our NEW Singlet Shortie Romper Sewing Pattern that is coming soon.

Heres a sneak peek:

Our New Singlet Shortie Romper Pattern (A4 Print at Home Version - DEMO)


Easy to put together print at home sewing patterns for your favourite Picklefish styles.


Sew your own adapted clothing with these easy to use digital patterns.


Coming soon!

Watch our socials for updates you don't want to miss our first release!

Wednesday, 5 November 2025

A New Blog Is Born

Moving back to Blogger.com


Hello and welcome back to the Picklefish NZ Blog.  For many years housed on my Picklefish Products NZ website.  As that business has closed down and the website become unpublished in mid-2025 I wanted to find another way to house my Tutorials and eventually assist with many of my adaptive wear designs, tips and tricks.

So I decided to head back and resurrect my old Blogger.com blog from many many years ago that housed all my AAC advice and the story of how Picklefish learned to use an iPad to communicate. 

If you found your way back then WELCOME!


I will be adding back a lot of the old sewing tutorials including FREE pattern hacks, and techniques I learnt over the years.  It will take me awhile to readd those posts from Wix.com where I originally housed them to over here.  But I am hoping that eventually there will be posts of value that you will love and find useful.

If you are not aware I have also been learning how to create Digital Sewing Patterns the past few years and have started releasing a few FREE sewing patterns.  Most are featured over on Facebook in a sewing group dedicated to a Custom Fabric Business OTY FABRICS that I do surface designs for as well.  Its my way of giving back to those who LOVE my designs and happily support OTY Fabrics as well.  I will pop a link below for anyone who wants to join the group and maybe find the free patterns or just want to share sewing tips and brag posts of what you have sewn. 

I will have more to share as time goes on so thanks for stopping by and don't forget to visit off and on and see what I post here.

Vivien

where all the magic happens - my sewing room!


Wednesday, 5 October 2016

DRAFT-A-LONG - Drafting a Boys Tshirt

Hi All!

I have decided to practice my new skill of pattern drafting and thought others may find it of use too.  There is plenty of tutorials out there that show you how to draft a pattern from a favourite well fitting tshirt.  But my tutorial is a little different.  Its how to draft a Tshirt using a template of measurements.  This tutorial shows you how to draft a Size 134cm (8-10 years) Boys loose fit tshirt with short sleeves.  I intend to follow up this post with a how to sew and how to adapt the pattern as time allows.  But if you ever wanted to make your son a tshirt and wanted a free pattern well try this!

What you'll need:


  • Paper - quite a wide piece you can use lunchwrap like I did or A3 sketch paper or you could use a piece of newspaper or even sellotape together a bunch of printer paper - your choice! It just needs to be wide enough and long enough.
  • A long ruler - I used a 40cm long clear ruler but you may need to have a measuring tape for the longer measurements 
  • Pen or Pencils - to sketch the lines - up to you if you use different colours for the lines and markers

A Drafting we will go:


Step 1:   

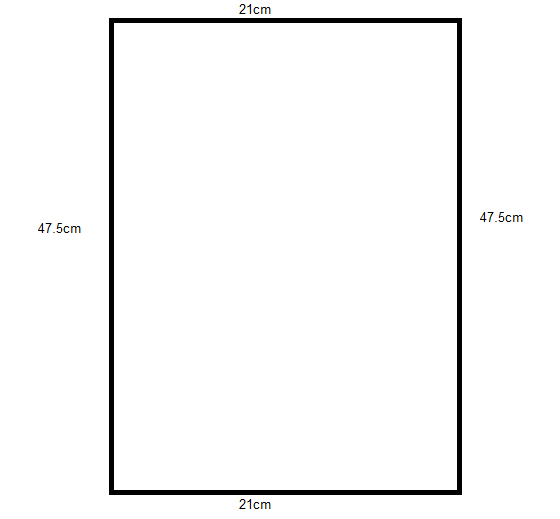
Draw a rectangle on your paper similar to the one in the picture.  Measure 21cm across the top, 47.5cm down one side and the other and close the rectangle with another 21cm line.


Step 2: 

Following the diagram make markers along the top line at 4cm, 9.5cm from the left corner and at 6.5cm and 2cm from the right hand corner.  Down the left hand side make a marker at 2cm, 7.5cm, and 20cm.  On the right hand side place markers at 3cm and 20cm.  Join the two 20cm markers with a line across the rectangle.

Step 3: 

Using the same diagram measure across from the left hand 7.5cm marker measure across a line 9.5cm long and from the top 9.5cm marker measure a 7.5cm line that joins to the previous line.  This will be the rectangle that helps you make the curve for the front neckline. 

Step 4: 

Draw a curve like the one shown in the diagram from the left hand 7.5cm marker to the 9.5cm marker on the top line.  The lines you drew in step 3 should assist you in making the curve.  From the 6.5cm marker on the top line measure down 1.5cm and place a marker.  At the 2cm marker on the top line measure down 3cm and place a marker.  Measure across from the right hand lines 12cm marker and put in a marker.  At the 20cm line measure across 2cm and put a marker draw a line that intersects all those markers from the top line to the 20cm line (the green line in the diagram).  At the 12cm+2cm marker measure across a further 2cm and place a marker.  Using the top 2cm marker the line you drew down and the 2cm marker you just made draw a curve that goes from the 2cm marker to the 20cm marker bending in to meet the 12cm+2cm marker as in the diagram.  In order to make the shoulder line measure across from the left hand top 9.5cm marker down towards the right hand 2cm marker but angled down 2cm insersecting the 1.5cm measurement measured down from the top lines 6.5cm marker.  

Step 5: 

For the final curve (the back neckline) you need to measure down 2cm from the top lines 4cm marker.  Join with a curve the left hand sides 2cm marker and the top lines 9.5cm marker curving under the 2cm marker you just made at 4cm.  Mark the left hand line with "FOLD" this will be the centre fold line when you cut the pattern out.  
Finishing off!

To finish off you can retrace the pattern to make a back and front pattern or when you cut out the pattern just trim off to the lower neckline for the front.

You have now drafted a front and back Tshirt pattern!  This pattern (without the sleeves - which will be in another post) can be used to sew up a singlet for your young man as well.  Stay tuned for Part two - drafting a short sleeve for your tshirt.

thanks for reading my tutorial/DRAFT-A-LONG!

Vivien


Tuesday, 10 November 2015

Tutorial - Adding Pockets to the Oliver+S Sunny Day Shorts Pattern


I wanted to make up the free 'Sunny Day Shorts' Pattern by Oliver & S but felt it needed some pockets so I decided to modify the pattern & make a tutorial for you all to see how it's done!

Instructions:

What You'll Need

- the pdf of the pattern printed out & sellotaped together (see link above)
- some tracing paper to trace the size you want onto
- felt or marker pens to draw your pattern
- Sellotape if required
- about 40-50cm X 120cm cotton fabric (I used drill)
- pins
- sewing machine
- thread
- 20mm wide elastic (about 60cm)

Tracing your pattern:

Select your size from the printed Sunny Shorts PDF & trace off all pieces in the size you want.

Adding pockets to the traced pattern:

Using just the traced front of the shorts pattern draw a curved line from the shorts pattern top & the side seam. I didn't really measure it I just 'guessed' how long & wide I wanted it. The first curve will be the pocket opening. Slightly away from that curve draw another curve in the shape of a pocket. My rule of thumb was to make it about 5cm away from the first curve at the top. The square grid on the Oliver&S pattern helps to give you a general size. (See the photo for how I did it)

From the traced pattern piece trace the pocket piece only, for the facing draw from the side seam across & down the second curve & back to the side seam. For the pocket pouch trace around the first curve (pocket opening) & across & down the second curve to the side seam. (See photo for pieces)

Cutting out your shorts:


Pin all your pieces to the fabric ensuring you cut out 2 pocket pouches & 2 pocket facings. For the front slash lines to the first curve & fold the piece back so you're able to cut the curve as part of the front. (See photo)

Sewing the shorts:

Pin the pocket pouch to the front shorts piece, matching curved edges right side to right side.  Pin and stitch

Turn out and iron flat.  Top stitch curved edge about 1/2cm away from the edge.


Place the front on the pocket facing piece matching the pocket pouch and pocket facing right sides together. (see photo) pin pocket facing and pocket pouch along outer edge and stitch.

Lay front and pocket flat, pin top of pockets and front at upper edge and side of pockets at side seam.  Baste in place.

Pin & stitch front and back together at side seams as mentioned in the Oliver+S instructions, catching in the pocket sides (you should have this happen easily if you basted as I said in the step above).

Continue following the instructions in the Oliver+S pattern instructions.  You should then end up with a completed shorts and be ready to do the waistband!

Continue to follow the instructions as mentioned in the pattern ensuring you catch the top of the pockets into the waistband (the basting should help) and you should have it looking like the below photo:

Follow the instructions for the waistband and you should have a completed pair of shorts with pockets like mine below!  Hope this helps you to modify the Oliver+S Sunny Day Shorts Pattern.


These are a great easy pair of shorts that fit really well and you can easily whip up lots of them.  If you aren't keen on doing the whole inset pockets like my instructions you could instead make patch pockets using a similar method or extending the shorts leg length and adding side pockets.  If you want me to make up a tutorial for those two options just ask!

Happy Sewing

Vivien

Friday, 18 September 2015

TUTORIAL - Sewing Ottobre 2009-04 #14 "Pistachio Chocolate" - Reversible Top

TUTORIAL - Sewing Ottobre 2009-04 #14
"Pistachio Chocolate" - Reversible Top

As promised heres the first of a series of sewing tutorials on how I went about sewing up the sometimes challenging Ottobre patterns.  Although generally Otto's are very easy and straightforward some patterns can be challenging even for seasoned seamstresses like myself!
This reversible raglan top appeared to be easy, and if you made it without making it reversible it would be!  I found there was a knack to getting the two tops together easily without twisting the sleeves and making it impossible to turn inside out and get right.

So I took photos as I went along so I could recreate the top in the future, and of course provide a tutorial on how I went about sewing it.

I had two lovely one-way stretch cottons that I had pre-washed and shrunk.  I had chosen to make a size 116cm tall for my great niece who at that time was only 4 1/2 years old but very tall! I wanted to make her something warmish for Autum/Winter and as I had found these coordinating cotton knits I thought it would make a lovely reversible sweatshirt for her.

Choosing the Fabrics and Cutting Out

So I needed to make sure the fabric was a good weight and wouldn't be too stretchy and I decided on one-way stretch cotton interlock that I pre-washed and put through the dryer on low so that it would also be pre-shrunk.  I do this for ease of use, the young Mum (my niece) who was going to be giving these to her daughter would need to be able to wash and dry them with minimum fuss so I made sure they could at least go through a dryer!
I didn't take any photos of the construction or cutting out as they were all pretty basic and if you follow the instructions for making up the basic two tops separately you should do fine. Its when you get to combining the two tops together that the instructions can be a bit unclear and confusing!

Joining the tops together - the challenging bit

The best way to do everything is to add the pocket to the side you wish, in my case I did it on the patterned side and omitted putting it on the plain side as well.  I then stitched the raglan armhole seams on both tops. Then you sew up the side seams and sleeve side seams as well. I chose to have the same fabric hood as the top which is different from what the pattern suggests, they instead chose to have the solid hood the same side as the striped top.  But I wanted it to be a solid fabric colour one side and the pattern the other side.  So after making both raglan tops up I then proceeded to stitch both hoods together at the centre seam and then placed them inside each other wrong side to wrong side and overlocked the outer edge together and bound with ribbing as suggested by the instructions.


Once the hoods were stitched together its time to put them
into one of the tops I chose to do the hood into the solid coloured top first.  I put the hood into the top right sides together (solid top right side to solid hood right side - see photo) and pinned then using a small zig-zag stitch on my standard sewing machine I sewed them together.


Then turn top inside out with patterned hood facing you


Place hood and top piece inside the patterned top body right sides together and pin.  Stitch these together around the neckline.  (I chose to overlock afterwards)


This photo shows the two tops overlocked together at the neck/hood neckline, with the patterned top inside the solid top.  You now have your two tops joined together at the neck edge.


You now need to separate your two tops so they are no longer 'inside' each other.  As you can see in this photo they are both pulled out to show their right sides and obviously attached at the neckline.


Now you have the fiddly job of pinning and stitching the cuff/sleeve edges together.  You do this by ensuring the sleeves are end to end on each other and not twisted. You can sort of see by my picture how they need to be attached.  I wish I had a good trick for making sure they are not twisted but I managed to do it wrong at least once and I have made these tops 3 times now!  If you eyeball as you go making sure the seamlines match up and that each sleeve seems to be straight with no twists in them you should be Ok.


This picture gives you a better view of how the sleeves need to be attached together.  I overlocked mine which was a bit fiddly and unfortunately I never took a photo of how I stitched them together on the machine.  The best way is to treat it as a 'flat' seam not a circular one.  Just keep flattening out the two fabrics right side to right side as you pull it through the overlocker (or sewing machine on small zig-zag) until you have a completed sewn together edge.

You need to do both sleeves like this before turning the sleeves right side out by threading one sleeve back over the other.


You should then have one top (e.g. the solid one) inside the other wrong sides together and the hemline should still need finishing like in this picture.


I pinned and overlocked the two edges together to make it easier and then just tucked it over to the solid side and stitched it down with a small zig-zag stitch to finish the hemline.  But its up to you how you finish it off.


And that is it! I hope those pictures and my somewhat unclear instructions are helpful in completing this Ottobre Pattern.  It really does make a lovely fitting top.

Stay tuned for more tutorials coming up in the future!

Cheers, Vivien

Monday, 14 September 2015

Tutorial Posts Planned!

Hi All!

I have posted lots of Special Needs Communication posts of late but I am going to start returning to my other love Sewing and Crafting! Therefore I am intending to post some tutorial posts (when I find time to get to them).  They will probably be past Ottobre magazine Kids clothing I have made and how I did them.  Anyone who uses these magazines knows they don't have much instructions, and certainly rarely have photos of HOW to do them so it can often be a bit tricky to work out exactly WHAT is meant by the sentence you have read and re-read a few times! So I will leave you with this taster and hopefully you'll have something to read and view shortly!

Vivien

Sunday, 24 May 2015

Clothing for Special Needs Kids - Adapt or Struggle

This is a bit off the topic of my usual Blog entries but I know one that will resonate with a lot of parents of SN kid out there.  If you have a kid with physical disabilities you often need to struggle with dressing them especially if they use a wheelchair a lot of the time.  This problem is not unique in the physically disabled community, even adults have trouble getting easily into and out of clothing and having it comfortably fit when you use a wheelchair.
Adding a snap crotch to a tshirt adapted for a child
(you can find my tutorial on upcycling tshirts to make these in the links below) 

There are many other problems with clothing that SN kids need help with, especially once they get older and the ability to have the features that were readily available when they were little (snap crotch closure say on tops) are almost non-existant or expensive to come across.  So being of the crafty persuasion I have often made things and adapted things to work.

I have used many a blog or tutorial to create clothing and adapt it for my son over the years.  I currently make swim nappies, bibs, bandanas, sometimes rompers and onesies, and even a waterproof cape for wearing when its wet. Along with this has been scouring the internet for advice and/or patterns.  With that has come some great resources.  So I thought I would share them with you all in case you too have a need for your child!

LINKS: Adapting Clothing or Buying Adapted Clothing for your Child: