Showing posts with label summer. Show all posts

Wednesday, 5 October 2016

DRAFT-A-LONG - Drafting a Boys Tshirt

Hi All!

I have decided to practice my new skill of pattern drafting and thought others may find it of use too.  There is plenty of tutorials out there that show you how to draft a pattern from a favourite well fitting tshirt.  But my tutorial is a little different.  Its how to draft a Tshirt using a template of measurements.  This tutorial shows you how to draft a Size 134cm (8-10 years) Boys loose fit tshirt with short sleeves.  I intend to follow up this post with a how to sew and how to adapt the pattern as time allows.  But if you ever wanted to make your son a tshirt and wanted a free pattern well try this!

What you'll need:


  • Paper - quite a wide piece you can use lunchwrap like I did or A3 sketch paper or you could use a piece of newspaper or even sellotape together a bunch of printer paper - your choice! It just needs to be wide enough and long enough.
  • A long ruler - I used a 40cm long clear ruler but you may need to have a measuring tape for the longer measurements 
  • Pen or Pencils - to sketch the lines - up to you if you use different colours for the lines and markers

A Drafting we will go:


Step 1:   

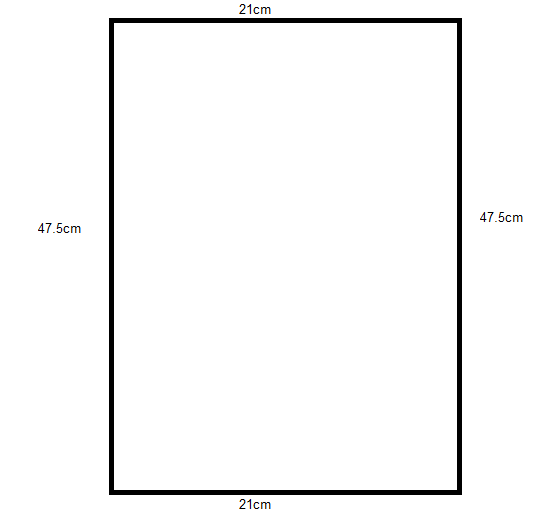
Draw a rectangle on your paper similar to the one in the picture.  Measure 21cm across the top, 47.5cm down one side and the other and close the rectangle with another 21cm line.


Step 2: 

Following the diagram make markers along the top line at 4cm, 9.5cm from the left corner and at 6.5cm and 2cm from the right hand corner.  Down the left hand side make a marker at 2cm, 7.5cm, and 20cm.  On the right hand side place markers at 3cm and 20cm.  Join the two 20cm markers with a line across the rectangle.

Step 3: 

Using the same diagram measure across from the left hand 7.5cm marker measure across a line 9.5cm long and from the top 9.5cm marker measure a 7.5cm line that joins to the previous line.  This will be the rectangle that helps you make the curve for the front neckline. 

Step 4: 

Draw a curve like the one shown in the diagram from the left hand 7.5cm marker to the 9.5cm marker on the top line.  The lines you drew in step 3 should assist you in making the curve.  From the 6.5cm marker on the top line measure down 1.5cm and place a marker.  At the 2cm marker on the top line measure down 3cm and place a marker.  Measure across from the right hand lines 12cm marker and put in a marker.  At the 20cm line measure across 2cm and put a marker draw a line that intersects all those markers from the top line to the 20cm line (the green line in the diagram).  At the 12cm+2cm marker measure across a further 2cm and place a marker.  Using the top 2cm marker the line you drew down and the 2cm marker you just made draw a curve that goes from the 2cm marker to the 20cm marker bending in to meet the 12cm+2cm marker as in the diagram.  In order to make the shoulder line measure across from the left hand top 9.5cm marker down towards the right hand 2cm marker but angled down 2cm insersecting the 1.5cm measurement measured down from the top lines 6.5cm marker.  

Step 5: 

For the final curve (the back neckline) you need to measure down 2cm from the top lines 4cm marker.  Join with a curve the left hand sides 2cm marker and the top lines 9.5cm marker curving under the 2cm marker you just made at 4cm.  Mark the left hand line with "FOLD" this will be the centre fold line when you cut the pattern out.  
Finishing off!

To finish off you can retrace the pattern to make a back and front pattern or when you cut out the pattern just trim off to the lower neckline for the front.

You have now drafted a front and back Tshirt pattern!  This pattern (without the sleeves - which will be in another post) can be used to sew up a singlet for your young man as well.  Stay tuned for Part two - drafting a short sleeve for your tshirt.

thanks for reading my tutorial/DRAFT-A-LONG!

Vivien


Tuesday, 10 November 2015

Tutorial - Adding Pockets to the Oliver+S Sunny Day Shorts Pattern


I wanted to make up the free 'Sunny Day Shorts' Pattern by Oliver & S but felt it needed some pockets so I decided to modify the pattern & make a tutorial for you all to see how it's done!

Instructions:

What You'll Need

- the pdf of the pattern printed out & sellotaped together (see link above)
- some tracing paper to trace the size you want onto
- felt or marker pens to draw your pattern
- Sellotape if required
- about 40-50cm X 120cm cotton fabric (I used drill)
- pins
- sewing machine
- thread
- 20mm wide elastic (about 60cm)

Tracing your pattern:

Select your size from the printed Sunny Shorts PDF & trace off all pieces in the size you want.

Adding pockets to the traced pattern:

Using just the traced front of the shorts pattern draw a curved line from the shorts pattern top & the side seam. I didn't really measure it I just 'guessed' how long & wide I wanted it. The first curve will be the pocket opening. Slightly away from that curve draw another curve in the shape of a pocket. My rule of thumb was to make it about 5cm away from the first curve at the top. The square grid on the Oliver&S pattern helps to give you a general size. (See the photo for how I did it)

From the traced pattern piece trace the pocket piece only, for the facing draw from the side seam across & down the second curve & back to the side seam. For the pocket pouch trace around the first curve (pocket opening) & across & down the second curve to the side seam. (See photo for pieces)

Cutting out your shorts:


Pin all your pieces to the fabric ensuring you cut out 2 pocket pouches & 2 pocket facings. For the front slash lines to the first curve & fold the piece back so you're able to cut the curve as part of the front. (See photo)

Sewing the shorts:

Pin the pocket pouch to the front shorts piece, matching curved edges right side to right side.  Pin and stitch

Turn out and iron flat.  Top stitch curved edge about 1/2cm away from the edge.


Place the front on the pocket facing piece matching the pocket pouch and pocket facing right sides together. (see photo) pin pocket facing and pocket pouch along outer edge and stitch.

Lay front and pocket flat, pin top of pockets and front at upper edge and side of pockets at side seam.  Baste in place.

Pin & stitch front and back together at side seams as mentioned in the Oliver+S instructions, catching in the pocket sides (you should have this happen easily if you basted as I said in the step above).

Continue following the instructions in the Oliver+S pattern instructions.  You should then end up with a completed shorts and be ready to do the waistband!

Continue to follow the instructions as mentioned in the pattern ensuring you catch the top of the pockets into the waistband (the basting should help) and you should have it looking like the below photo:

Follow the instructions for the waistband and you should have a completed pair of shorts with pockets like mine below!  Hope this helps you to modify the Oliver+S Sunny Day Shorts Pattern.


These are a great easy pair of shorts that fit really well and you can easily whip up lots of them.  If you aren't keen on doing the whole inset pockets like my instructions you could instead make patch pockets using a similar method or extending the shorts leg length and adding side pockets.  If you want me to make up a tutorial for those two options just ask!

Happy Sewing

Vivien

Wednesday, 26 August 2015

Our Toilet Training Journey

Hi All, its been a long time between posts I have noticed and I seem to have gone away from my original intention of using this blog to discuss our communication journey so others might be able to use our experiences to learn too.  However, being a Special Needs Parent, you soon discover everything is just that little bit different from raising a 'normal' child.  Everything in our lives has been a challenge in one way or another, and toilet training has been no different.  We've had great progress that has been setback with surgeries and then illness and finally with us parents just deciding to leave it alone for a bit until other things our son was going through came right first.

Communication = Toileting Triumph

One thing that needed to work in order for toileting to be successful was our sons ability to communicate the need to go.  He seemed to understand he needed to use the potty in the beginning.  We started putting him on the potty when he was 2 years old after advice from a friend who had an autistic grandchild who as a teenager was still not toilet trained.  Back then we never worried about him asking to go to the toilet or even had a communication plan, we just put him on the potty for long periods of time (20 minutes) about 30-60 minutes after he'd had something to eat and drink.  If we got success we made a big fuss about him and celebrated! For awhile we got lots of success and I still sat him on the potty while I went toilet and 'modelled' how it was done.  Then all of a sudden he stopped going on the potty and for a whole month we got no success.  Then one day I decided to try him on the toilet and bingo! he went! It was then I realised all my modelling had given him the idea that was where you went toilet, not on a potty.  So from then onwards he was toileted.  However, our son was getting big, and heavy, but he didn't have good trunk control back then so it was difficult to keep him comfortable on the toilet and safe.  So we opted for morning and night time toileting with the odd lunch stop as well.
When he started at a special preschool (Conductive Education) they started a toileting program with him and it was there we decided he needed to be able to tell us when he needed to go.  So we started with a basic card (you can see the picture we used above) and everytime he was taken to the toilet we would touch the card and say 'Toilet', we hoped he would learn to associate the card with the intention/concept.

Toileting Setback - Hip Dysplasia Surgery

Hip Spica Cast - Part One - 2011

Back in late 2010 when we were all reeling from the Canterbury 7.1 Mag earthquake we also got the news that our son had been walking with a dislocated left leg.  He was then scheduled for hip reconstruction and 3 months in a Hip Spica cast in early 2011.  He underwent very major surgery and ended up in a broomstick hip cast (see picture to the right).  During that time it was very unwieldy to toilet him but we managed it off and on by holding him on the toilet supported at the cast.  We got some modicum of success.  Alas this was a setback for more than just toileting so we abandoned anything formal as we just got on with recovering from both the 2010 & 2011 Earthquakes and his hip surgery.  When he came out of cast in Mid 2011 we again started gently working on his toileting, nothing major just morning and night-times.  Fast forward to summer 2011-12 and I put him in undies and spent a few weeks over the summer holidays trying unsuccessfully to toilet train him.

What were the problems?

We had to accept the fact there were a few problems with this whole toileting process.  Namely the following:

  • He had no way of telling us he needed to go toilet
  • He couldn't physically get to the toilet himself
  • He didn't appear to be aware of his bladder
  • He suffered from constipation as a side effect of his surgery
So we had to tackle those as time went on.  These are still issues years later in 2015 we have still not resolved.  He again dislocated another leg, this time the right hip, and needed another hip surgery and 3 months in a hip cast in early 2013. So any progress we may have made with him being aware of his toileting needs were again dashed as he had to get used to going in a nappy all over again!
Hip Spica Cast - Part 2 - November 2013


What Methods Have We Tried?

Over the years we have been given many ideas, methods, theories etc on how best to teach our son to be aware of how to toilet.  From pouring water over his privates as he sits on the toilet, to wearing undies within a nappy, to letting him sit in wet undies in the hopes he won't like how it feels.  But all were failures, he just didn't seem to be aware of needing to go the toilet.  By now we had 99% success with solids on the toilet and he was also using the iPad to request tentatively that he needed to go.  However, getting him to just urinate on the toilet was proving to be a hassle.  We were able to get him sitting comfortably on the toilet, his torso control was good and balance stable.  He was doing lovely standing holding onto a rail by the toilet so we could assist with trousers and nappy down and onto the toilet.  He was still struggling with ongoing constipation but medication was helping with that.  So heres a list of what we've tried and how successful its been or not been:

  • 'feel wet' toilet training undies - they just got wet, he never seemed to get it
  • reusable nappies (PUL+Microfleece - homemade) - they leaked, he needed changing, he didn't mind being wet
  • Undies + scheduled time on the toilet - he would wee in the undies 5 minutes after being taken off the toilet, he never cared if he was wet
  • wetting the privates - made him irritable and never made him wee
  • running the tap while hes on the toilet - nothing there either
  • Putting a tissue in his nappy or a strip of cotton fabric so he would feel wet - didn't bug him
  • Undies and then a nappy over the top to catch any wees - similar to previous option - nothing
  • Reward Charts and stickers for success - an excellent way of tracking successes but he never understood the concept of the rewards
  • Water sensor placed in undies that played a tune when wet - terrified the poor guy!
  • Trainer undies with a soaker pad - leaked, he never noticed he was wet 
  • Scheduled toilet times - within an hour of a drink - mixed success, he appears to have some bladder control

Where to from here?

Well we're still working on that, scheduled times have been the most successful, along with modelling concepts (e.g. an adult going toilet and explaining while he watches on), and expectation that he will go at specific times.  Its been tricky to work out how soon after a drink or meal he will go toilet and to get the right timing, often he has been or will go quicker than I think.  But then other times I will take him and nothing will happen despite leaving him on toilet for 10 minutes.  But within 5 minutes of coming off the toilet he will go.  I don't believe he has too much awareness of his bladder but he does have awareness of going wees.  He does like the reward of us making a fuss and saying how great he is when he succeeds so thats helpful.
Continuing to model 'I need to go to the toilet' on his iPad has also proven useful.  He is now requesting to go even if hes not successful.  We are 50/50 successful these days.

I read this great blog entry http://bloomwhereheplantsyou.com/2013/01/diy-pull-ups/ about making your own pull-ups using sanitary pads with trainer undies and we are now trying that, undies he has helped choose and a Poise Extra Plus pad put in.  He is given the option of that or a pull-up nappy and he invariably chooses the underwear option.  The big bonus for us so far has been him showing awareness he has gone in the pad.  Everytime he has gone in the pad he has requested to go the toilet straight after so we can change it.  Just tonight he requested to go to the toilet and when placed on it he finally went wees successfully.  We have tried so many different ideas over the years but this fledgling success is promising.  We'll keep you posted on how this all goes. 

If you like us are finding teaching a special needs child how to toilet take heart, you're not alone!

thanks for reading my blog 

Vivien
Monday, 3 November 2014

TUTORIAL - Making a Tiered Version of Ottobre 3/2012-#28 - Hawaii Flowers dress

Hi All, I had some great fabric I brought called 'Savannah' a lovely cotton with printed bands that just screamed to be made into striped tiers on a girls dress.  Feeling inspired I browsed through all my Ottobre magazines looking for THE pattern.  I even trolled Google and Pinterest.  I eventually felt inspired into using a shirred bodice and tiered skirt pieces.  So I chose to modify the Hawaii Flowers Dress from 3/2012.  As you can see in my photos I had two different colourways for the Savannah fabric, a dusky pink and a lovely sage green.  I decided to use each fabric in the dress. This was made in 128cm size for a 7 year old girl. So heres how I went about doing it:


First I created the pattern from the pattern sheet.
I then made a line on each pattern piece about at the waistband level.  It was kind of arbitrary and I thought - about here.


I didn't show too much of this step - but here is the finished bodice piece. I sewed the left side seam
with the overlocker, did a narrow edge on the top of the bodice and overlocked the bottom of the bodice. I then shirred the bodice with my standard sewing machine. I used the method mentioned in the Ottobre magazine, where you fill a bobbin by hand with shirring elastic and stitch evenly spaced rows along the width of the bodice piece turning at each edge and stitching back along the width an even spacing from the previous row.
(Heres a link to Made by Rae's tutorial on how to do shirring in case you want to see a more visual method than the one in the Otto Magazine - http://www.made-by-rae.com/2013/08/tutorial-shirring-with-elastic-thread/)


I then placed a piece of the green fabric under the bodice piece pattern and cut it to the width of the
bottom of the bodice pieces (the second part under the line I drew).  I cut out one of the front on the fold and one of the back on the fold.  I sewed up the side seams & overlocked both long edges. 


I then created another tier from the pink fabric this time just putting the first tier on top of the pink fabric and choosing to cut it about 5cm wider than the previous strip.  Again I stitched it into a circle and overlocked both long edges.

Both strips were basted with long running stitches along one edge.  I chose the smaller stripe on the fabric to be the bottom of each tier.  I first pinned and sewed the green top tier to the bodice but in retrospect I think its better if you create the skirt tiers first and then at the end gather the skirt top and sew it onto the dress bodice. 


I continued to create alternate tiers each time adding about 5cm to the length of the upper tier on each successive strip.  I also continued to sew up each side seam and overlock both upper and lower long edges.  Then basted with long running stitches, gathered each tier and pinned and sewed to each upper tier.  I alternated colours from green or pink as shown in the photos. 


On the last tier I sewed a small hem which I did after completing the final tier.  It turned out to be a bit shorter than anticipated so I ended up unpicking that hem and adding another pink tier to finish the length.  


The bodice was finished off as per the pattern by making two strips of fabric for the shoulder straps.  I chose to use the stripe of the fabric again as the strip in the centre of the strap.  Both long edges were overlocked then a narrow edge sewn with a standard machine.  The pattern calls for 3 evenly spaced shirred lines to be sewn onto each shoulder strap.  Once done you then stitch the straps to the first shirred line of the bodice top at the marks shown on the pattern.  


That was it!  
It was a simple mod of the pattern to create what ended up being a rather beautiful dress if I do say so myself!