Monday, 19 December 2016

Accessible House Update and Christmas Treat Toppers - FREE PRINTABLE


Hi All and Merry Christmas from all of us!

ACCESSIBLE HOUSE - An Update


Thank you to all those that have visited our blog and followed our somewhat disjointed story via this blog.  I will update on the Accessible Home as we progress, but suffice to say its now with the Council awaiting approval of the plans.  We have also started the LifeMark Certification of the house to make sure both ourselves and the Building Company we engaged keep to the Accessibility plans for the house.  One thing that has come out of the process so far is that if anyone asks me of a recommendation for building companies or building an accessible home I would say to ask the company this (not the salesman because they will tell you ANYTHING to get a sale) and when I say ASK the Company I mean ask the Management of the Company whether that be the CEO or whomever is closest to the top.  Ask them "HAS YOUR COMPANY EVER BUILT AN ACCESSIBLE HOME BEFORE?" if they say "YES" then ask: "HOW MANY HAVE YOU ACTUALLY BUILT?" I would then go on to ask them details of how they built it, what level of disability the customer had etc.  It doesn't have to go into personal details its just so you can gauge their level of expertise and UNDERSTANDING.  Its really stood out to us these past few months that the general mobile population seems to think those with limited mobility are probably Old People and their perception is skewed coupled with a innocent ignorance of the way those of us with a disabled person in our care live our lives.  I am sure we didn't get a lot of things right and we'll figure that out once we live in the place.  Its hard having a child that is both mobile and requires a wheelchair to get around.  Its hard trying to meet both needs and often we aren't sure what the future holds for us.
One of the many iterations of the kitchen design
Recently we've started the process for a new bed, a new van (with wheelchair hoist), a new wheelchair, hoists, the housing team to go over the new build and lots of other adaptations.  This is because next year our son turns 10 and he is growing and getting TALL and HEAVY! But mostly its so we can work on HIS independence and so we can bring in Carers and Buddies to help him live his life in the best way he can.  2017 is shaping up to be an interesting year with lots of new adventures for us all.


But onto Christmas and what we've been doing lately...

CHRISTMAS GOODIES

With a new home looming the finances are a bit tight so we opted to make homemade goodies for our friends and family as gifts.  It was also something our son loves to do, COOKING!
So we have been busily making our famed Creamy Fudge recipe that we have been asked to make for the last few Christmases.With that is each year we try different ways of packaging them.  Last year I think I made Origami Boxes using Scrapbooking Paper.  This year I went for Cellophane bags and Treat Toppers.  If you google or Pinterest Treat Toppers you'll find all sorts out there, some good, some a bit...well... different and not my cup of tea, and then there are plenty you can pay for...either way it was just a little too MUCH to wade through and find just THE one so instead I got busy with the Desktop Publishing Software (PagePlus Starter - I've mentioned it in previous blog entries) and made a topper of my own.  So I thought I would share it with you here:
(requires a Google DRIVE login to open and Adobe Viewer to View)


So Print them out on A4 Paper with your printer, Cut out each one and fold in half then place over the top of your Sellotaped down Cellophane Bag and staple in place (like I have here):


We shoved lots of Christmas Shortbread , the fudge and intend to make White Chocolate Chip and Cranberry Cookies as well then put them all into Tins to take to our friends.


Thanks for Reading our blog and ENJOY!


Wednesday, 5 October 2016

DRAFT-A-LONG - Drafting a Boys Tshirt

Hi All!

I have decided to practice my new skill of pattern drafting and thought others may find it of use too.  There is plenty of tutorials out there that show you how to draft a pattern from a favourite well fitting tshirt.  But my tutorial is a little different.  Its how to draft a Tshirt using a template of measurements.  This tutorial shows you how to draft a Size 134cm (8-10 years) Boys loose fit tshirt with short sleeves.  I intend to follow up this post with a how to sew and how to adapt the pattern as time allows.  But if you ever wanted to make your son a tshirt and wanted a free pattern well try this!

What you'll need:


  • Paper - quite a wide piece you can use lunchwrap like I did or A3 sketch paper or you could use a piece of newspaper or even sellotape together a bunch of printer paper - your choice! It just needs to be wide enough and long enough.
  • A long ruler - I used a 40cm long clear ruler but you may need to have a measuring tape for the longer measurements 
  • Pen or Pencils - to sketch the lines - up to you if you use different colours for the lines and markers

A Drafting we will go:


Step 1:   

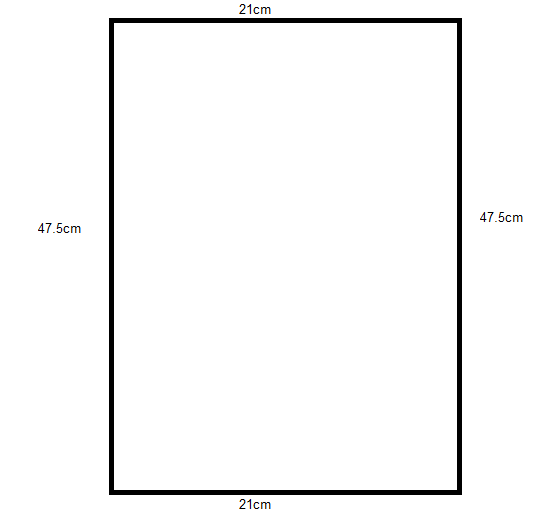
Draw a rectangle on your paper similar to the one in the picture.  Measure 21cm across the top, 47.5cm down one side and the other and close the rectangle with another 21cm line.


Step 2: 

Following the diagram make markers along the top line at 4cm, 9.5cm from the left corner and at 6.5cm and 2cm from the right hand corner.  Down the left hand side make a marker at 2cm, 7.5cm, and 20cm.  On the right hand side place markers at 3cm and 20cm.  Join the two 20cm markers with a line across the rectangle.

Step 3: 

Using the same diagram measure across from the left hand 7.5cm marker measure across a line 9.5cm long and from the top 9.5cm marker measure a 7.5cm line that joins to the previous line.  This will be the rectangle that helps you make the curve for the front neckline. 

Step 4: 

Draw a curve like the one shown in the diagram from the left hand 7.5cm marker to the 9.5cm marker on the top line.  The lines you drew in step 3 should assist you in making the curve.  From the 6.5cm marker on the top line measure down 1.5cm and place a marker.  At the 2cm marker on the top line measure down 3cm and place a marker.  Measure across from the right hand lines 12cm marker and put in a marker.  At the 20cm line measure across 2cm and put a marker draw a line that intersects all those markers from the top line to the 20cm line (the green line in the diagram).  At the 12cm+2cm marker measure across a further 2cm and place a marker.  Using the top 2cm marker the line you drew down and the 2cm marker you just made draw a curve that goes from the 2cm marker to the 20cm marker bending in to meet the 12cm+2cm marker as in the diagram.  In order to make the shoulder line measure across from the left hand top 9.5cm marker down towards the right hand 2cm marker but angled down 2cm insersecting the 1.5cm measurement measured down from the top lines 6.5cm marker.  

Step 5: 

For the final curve (the back neckline) you need to measure down 2cm from the top lines 4cm marker.  Join with a curve the left hand sides 2cm marker and the top lines 9.5cm marker curving under the 2cm marker you just made at 4cm.  Mark the left hand line with "FOLD" this will be the centre fold line when you cut the pattern out.  
Finishing off!

To finish off you can retrace the pattern to make a back and front pattern or when you cut out the pattern just trim off to the lower neckline for the front.

You have now drafted a front and back Tshirt pattern!  This pattern (without the sleeves - which will be in another post) can be used to sew up a singlet for your young man as well.  Stay tuned for Part two - drafting a short sleeve for your tshirt.

thanks for reading my tutorial/DRAFT-A-LONG!

Vivien


Tuesday, 20 September 2016

Building an Accessible Home - an update

Hi All

Well its been a full on bunch of weeks deciding on fittings and hard flooring etc.  This will just be a quick update with a warning that when working with Building Companies be sure you ALL understand the requirements.  That what YOU are expecting matches what they are doing.  We have had a hiccup as we proceed with this which has just been a miscommunication.  We wrote on our list of requirements 'Extra Wide Doorways', we suspect we said what width that was (910mm) but as there is a Government Accessibility code that states doorways need to be at least 810mm wide (the door size) the Building Company Designers have innocently taken that Code as the means by which they are designing our house.  So rather than take our requirements they have assumed that we want to follow the "Code" and have designed based on that.
Our assumption was they were following our requirements rather than the code so we never took note before signing of the apparent differences.
So our suggestion would be if there are important features that are non-negotiable (like doorway widths) that you are VERY sure what they are going to be, and that there is an agreement in writing or at least a specified size written on the contract before you sign or pay for it.  Alas in our case nothing was written so we are hopeful they will understand our stance on the extra wide hallways and doors and make the change without too much cost to the overall plan.


If you are interested in the Government Accessibility code and perhaps designing a compliant 5 star home yourselves you can easily look it up here:


You can check out there Pinterest recommendations here:


thanks everyone and keep posted for the next few updates.  I am intending to blog about our choices and design.  We let our son choose the vinyl planking for the main living zone and I would have to say that kid has taste!

Vivien

Building an Accessible Home - an update

Hi All

Well its been a full on bunch of weeks deciding on fittings and hard flooring etc.  This will just be a quick update with a warning that when working with Building Companies be sure you ALL understand the requirements.  That what YOU are expecting matches what they are doing.  We have had a hiccup as we proceed with this which has just been a miscommunication.  We wrote on our list of requirements 'Extra Wide Doorways', we suspect we said what width that was (910mm) but as there is a Government Accessibility code that states doorways need to be at least 810mm wide (the door size) the Building Company Designers have innocently taken that Code as the means by which they are designing our house.  So rather than take our requirements they have assumed that we want to follow the "Code" and have designed based on that.
Our assumption was they were following our requirements rather than the code so we never took note before signing of the apparent differences.
So our suggestion would be if there are important features that are non-negotiable (like doorway widths) that you are VERY sure what they are going to be, and that there is an agreement in writing or at least a specified size written on the contract before you sign or pay for it.  Alas in our case nothing was written so we are hopeful they will understand our stance on the extra wide hallways and doors and make the change without too much cost to the overall plan.


If you are interested in the Government Accessibility code and perhaps designing a compliant 5 star home yourselves you can easily look it up here:


You can check out there Pinterest recommendations here:


thanks everyone and keep posted for the next few updates.  I am intending to blog about our choices and design.  We let our son choose the vinyl planking for the main living zone and I would have to say that kid has taste!

Vivien

Wednesday, 7 September 2016

Building an Accessible Home


Its been some time since my last bunch of blog entries and plenty has gone on since then.  I hope you have been enjoying my sewing tutorials and history of AAC progress! In the past year (where did 2016 go?) we have been realising that our current house doesn't work for a now 9 year old son in a wheelchair.  So what to do?  Well we shopped around for bigger houses, with large sections, or a purpose built house with enough open plan features that we could modify it to work for us.  In the end we brought a section and have now set about building an accessible home for us all.  Its been a long process and its only just starting.

Our current house in Springston on a cold morning

So our intention is to post blog updates on our progress, so if you too are thinking of building an accessible home you can see our thought processes and how we went about building our place.

Our original rough design done with Room Sketcher software

So what are we building?

Well we opted for a smaller section, its going to be hard leaving behind our semi-rural 1/2 acre in a rural town to move to the suburbs, but we have chosen to do that so we are closer to his schools, the hydrotherapy pool and so we have a property we can manage.  The reality is that as our son gets bigger he gets heavier and there is only so much energy in a day you can expend without being physically exhausted.  So managing a large garden isn't one I could keep up not without employing a full time carer for our son.  

One of the many variations - this one we almost went with

Open plan rocks!

Yes thats what we discovered, turning circles for wheelchairs, negotiating hallways, doorways and right angles were becoming a mission.  Inside our house now we were running out of space, in varying places and varying times we have had LOTS of equipment cluttering up the place.  Walkers, standing frames, wheelchair, buggy, bikes, tables, toys, bathing chairs you name it.  We even had a hoist but returned it as there really wasn't room for it.  We have separate rooms for everything with a long hallway linking everything.  Its been Ok but now our sons wheelchair is getting bigger along with him.  One bonus is that hes started to walk with his anterior walker but still needs full assistance to do cornering or moving on carpet.  So we have decided the main living area needs to be simple, open plan and have large turning circles.  
Our son also has separation anxiety when we aren't within his view most of the time, some days hes totally Ok in a room on his own as long as he knows your close. But other days hes prone to being very distressed if you're not within view.  So open plan it is.


Our inspirations

What was important?

Well that was what we realised we had to get to so that we didn't break the budget.  We realised we needed to stay in our current place until the very last minute and servicing a large mortgage was going to be hard work.  So there wasn't going to be the option of selling our place, moving somewhere and renting while the house was built, or even staying in a caravan on the land.  Nope, we had to stick to a modest budget and tighten the finances.  So inevitably our 'wish list' had to whittle down to what was REALLY important?
  • Open plan living, dining and kitchen
  • Wide doorways, hallways and entrance
  • No real right angle turns, good flow between spaces
  • Decent sized bedrooms, especially for our son
  • A wetroom bathroom fully accessible from our sons room 
  • Good hard landscaping outside for his wheelchair
  • Level entry decks and ramps so he could go outside easily
  • Large garage to accommodate a van with hoist (able to be opened with garage door closed)
  • A private space for our son as he gets older
  • A private space for us and our own bathroom
  • A workspace for myself so I can continue my Special Needs Clothing business from home
A very early design of the property - this is the landscaping plan,
ultimately this was just too expensive but we would have loved it!

What ended up staying on the list?

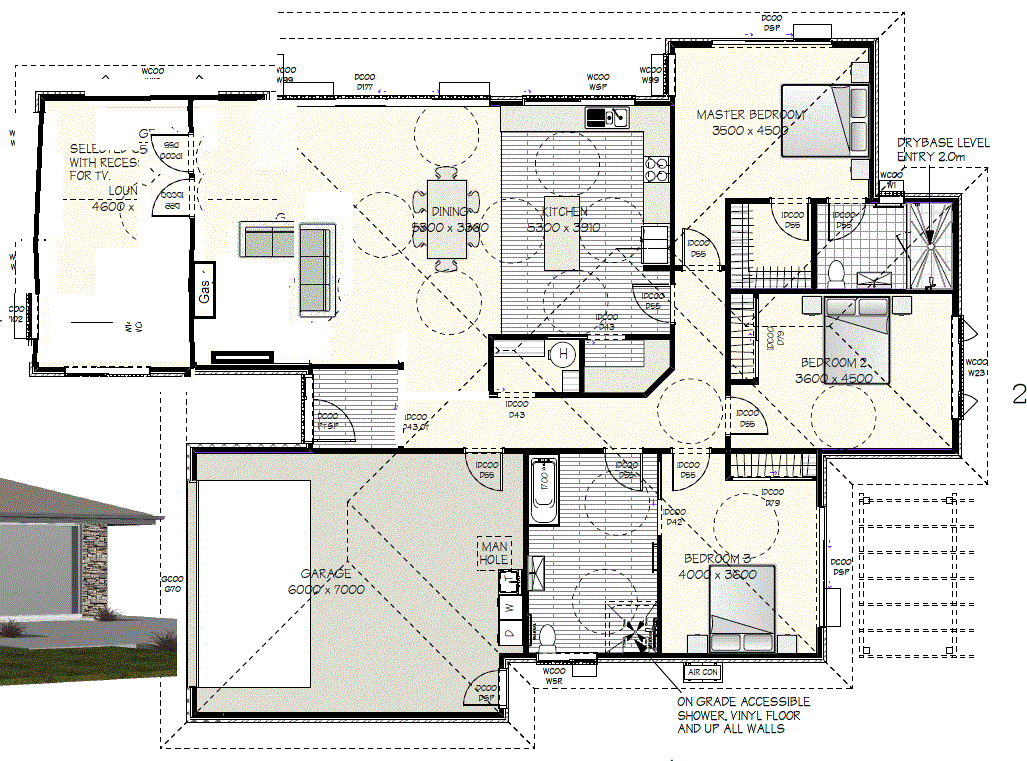
Most of it actually, my workspace is now taking the spare bedroom and visitors may end up sleeping in the lounge LOL.  Unfortunately we just couldn't afford the 4th bedroom so we could have a storage space for equipment and visitors if they came to stay.  I needed my workshop so again the 3rd bedroom will be primarily my workshop but with an option of a bed in there if we have people to stay over.  We also had to opt for a concrete patio out from our sons room and we will have to provide the ramping ourselves into his room.  As I have threshold ramps already I didn't think that would be too hard.  We have a fully removable ramp fully funded for our current house and can approach the fund-holders about relocating that to the new house if necessary.  


Time to start the house!

So that's where we're at now...the designing of the house has been done, the money has changed hands, and we now start the designing of the fitout, choose the flooring, the colours, the bathroom, then await the foundations being built.
Right now I am going to meetings with suppliers confirming things and soon I will be posting more blog updates of progress so keep checking in and seeing how we're going.  I will endeavour to explain our reasoning for varying features as the house build starts in earnest.


Here is the final elevation and plans - it all looks a bit different in black and white.  

Tuesday, 10 November 2015

Tutorial - Adding Pockets to the Oliver+S Sunny Day Shorts Pattern


I wanted to make up the free 'Sunny Day Shorts' Pattern by Oliver & S but felt it needed some pockets so I decided to modify the pattern & make a tutorial for you all to see how it's done!

Instructions:

What You'll Need

- the pdf of the pattern printed out & sellotaped together (see link above)
- some tracing paper to trace the size you want onto
- felt or marker pens to draw your pattern
- Sellotape if required
- about 40-50cm X 120cm cotton fabric (I used drill)
- pins
- sewing machine
- thread
- 20mm wide elastic (about 60cm)

Tracing your pattern:

Select your size from the printed Sunny Shorts PDF & trace off all pieces in the size you want.

Adding pockets to the traced pattern:

Using just the traced front of the shorts pattern draw a curved line from the shorts pattern top & the side seam. I didn't really measure it I just 'guessed' how long & wide I wanted it. The first curve will be the pocket opening. Slightly away from that curve draw another curve in the shape of a pocket. My rule of thumb was to make it about 5cm away from the first curve at the top. The square grid on the Oliver&S pattern helps to give you a general size. (See the photo for how I did it)

From the traced pattern piece trace the pocket piece only, for the facing draw from the side seam across & down the second curve & back to the side seam. For the pocket pouch trace around the first curve (pocket opening) & across & down the second curve to the side seam. (See photo for pieces)

Cutting out your shorts:


Pin all your pieces to the fabric ensuring you cut out 2 pocket pouches & 2 pocket facings. For the front slash lines to the first curve & fold the piece back so you're able to cut the curve as part of the front. (See photo)

Sewing the shorts:

Pin the pocket pouch to the front shorts piece, matching curved edges right side to right side.  Pin and stitch

Turn out and iron flat.  Top stitch curved edge about 1/2cm away from the edge.


Place the front on the pocket facing piece matching the pocket pouch and pocket facing right sides together. (see photo) pin pocket facing and pocket pouch along outer edge and stitch.

Lay front and pocket flat, pin top of pockets and front at upper edge and side of pockets at side seam.  Baste in place.

Pin & stitch front and back together at side seams as mentioned in the Oliver+S instructions, catching in the pocket sides (you should have this happen easily if you basted as I said in the step above).

Continue following the instructions in the Oliver+S pattern instructions.  You should then end up with a completed shorts and be ready to do the waistband!

Continue to follow the instructions as mentioned in the pattern ensuring you catch the top of the pockets into the waistband (the basting should help) and you should have it looking like the below photo:

Follow the instructions for the waistband and you should have a completed pair of shorts with pockets like mine below!  Hope this helps you to modify the Oliver+S Sunny Day Shorts Pattern.


These are a great easy pair of shorts that fit really well and you can easily whip up lots of them.  If you aren't keen on doing the whole inset pockets like my instructions you could instead make patch pockets using a similar method or extending the shorts leg length and adding side pockets.  If you want me to make up a tutorial for those two options just ask!

Happy Sewing

Vivien

Friday, 18 September 2015

TUTORIAL - Sewing Ottobre 2009-04 #14 "Pistachio Chocolate" - Reversible Top

TUTORIAL - Sewing Ottobre 2009-04 #14
"Pistachio Chocolate" - Reversible Top

As promised heres the first of a series of sewing tutorials on how I went about sewing up the sometimes challenging Ottobre patterns.  Although generally Otto's are very easy and straightforward some patterns can be challenging even for seasoned seamstresses like myself!
This reversible raglan top appeared to be easy, and if you made it without making it reversible it would be!  I found there was a knack to getting the two tops together easily without twisting the sleeves and making it impossible to turn inside out and get right.

So I took photos as I went along so I could recreate the top in the future, and of course provide a tutorial on how I went about sewing it.

I had two lovely one-way stretch cottons that I had pre-washed and shrunk.  I had chosen to make a size 116cm tall for my great niece who at that time was only 4 1/2 years old but very tall! I wanted to make her something warmish for Autum/Winter and as I had found these coordinating cotton knits I thought it would make a lovely reversible sweatshirt for her.

Choosing the Fabrics and Cutting Out

So I needed to make sure the fabric was a good weight and wouldn't be too stretchy and I decided on one-way stretch cotton interlock that I pre-washed and put through the dryer on low so that it would also be pre-shrunk.  I do this for ease of use, the young Mum (my niece) who was going to be giving these to her daughter would need to be able to wash and dry them with minimum fuss so I made sure they could at least go through a dryer!
I didn't take any photos of the construction or cutting out as they were all pretty basic and if you follow the instructions for making up the basic two tops separately you should do fine. Its when you get to combining the two tops together that the instructions can be a bit unclear and confusing!

Joining the tops together - the challenging bit

The best way to do everything is to add the pocket to the side you wish, in my case I did it on the patterned side and omitted putting it on the plain side as well.  I then stitched the raglan armhole seams on both tops. Then you sew up the side seams and sleeve side seams as well. I chose to have the same fabric hood as the top which is different from what the pattern suggests, they instead chose to have the solid hood the same side as the striped top.  But I wanted it to be a solid fabric colour one side and the pattern the other side.  So after making both raglan tops up I then proceeded to stitch both hoods together at the centre seam and then placed them inside each other wrong side to wrong side and overlocked the outer edge together and bound with ribbing as suggested by the instructions.


Once the hoods were stitched together its time to put them
into one of the tops I chose to do the hood into the solid coloured top first.  I put the hood into the top right sides together (solid top right side to solid hood right side - see photo) and pinned then using a small zig-zag stitch on my standard sewing machine I sewed them together.


Then turn top inside out with patterned hood facing you


Place hood and top piece inside the patterned top body right sides together and pin.  Stitch these together around the neckline.  (I chose to overlock afterwards)


This photo shows the two tops overlocked together at the neck/hood neckline, with the patterned top inside the solid top.  You now have your two tops joined together at the neck edge.


You now need to separate your two tops so they are no longer 'inside' each other.  As you can see in this photo they are both pulled out to show their right sides and obviously attached at the neckline.


Now you have the fiddly job of pinning and stitching the cuff/sleeve edges together.  You do this by ensuring the sleeves are end to end on each other and not twisted. You can sort of see by my picture how they need to be attached.  I wish I had a good trick for making sure they are not twisted but I managed to do it wrong at least once and I have made these tops 3 times now!  If you eyeball as you go making sure the seamlines match up and that each sleeve seems to be straight with no twists in them you should be Ok.


This picture gives you a better view of how the sleeves need to be attached together.  I overlocked mine which was a bit fiddly and unfortunately I never took a photo of how I stitched them together on the machine.  The best way is to treat it as a 'flat' seam not a circular one.  Just keep flattening out the two fabrics right side to right side as you pull it through the overlocker (or sewing machine on small zig-zag) until you have a completed sewn together edge.

You need to do both sleeves like this before turning the sleeves right side out by threading one sleeve back over the other.


You should then have one top (e.g. the solid one) inside the other wrong sides together and the hemline should still need finishing like in this picture.


I pinned and overlocked the two edges together to make it easier and then just tucked it over to the solid side and stitched it down with a small zig-zag stitch to finish the hemline.  But its up to you how you finish it off.


And that is it! I hope those pictures and my somewhat unclear instructions are helpful in completing this Ottobre Pattern.  It really does make a lovely fitting top.

Stay tuned for more tutorials coming up in the future!

Cheers, Vivien

Monday, 14 September 2015

Tutorial Posts Planned!

Hi All!

I have posted lots of Special Needs Communication posts of late but I am going to start returning to my other love Sewing and Crafting! Therefore I am intending to post some tutorial posts (when I find time to get to them).  They will probably be past Ottobre magazine Kids clothing I have made and how I did them.  Anyone who uses these magazines knows they don't have much instructions, and certainly rarely have photos of HOW to do them so it can often be a bit tricky to work out exactly WHAT is meant by the sentence you have read and re-read a few times! So I will leave you with this taster and hopefully you'll have something to read and view shortly!

Vivien

Wednesday, 26 August 2015

Our Toilet Training Journey

Hi All, its been a long time between posts I have noticed and I seem to have gone away from my original intention of using this blog to discuss our communication journey so others might be able to use our experiences to learn too.  However, being a Special Needs Parent, you soon discover everything is just that little bit different from raising a 'normal' child.  Everything in our lives has been a challenge in one way or another, and toilet training has been no different.  We've had great progress that has been setback with surgeries and then illness and finally with us parents just deciding to leave it alone for a bit until other things our son was going through came right first.

Communication = Toileting Triumph

One thing that needed to work in order for toileting to be successful was our sons ability to communicate the need to go.  He seemed to understand he needed to use the potty in the beginning.  We started putting him on the potty when he was 2 years old after advice from a friend who had an autistic grandchild who as a teenager was still not toilet trained.  Back then we never worried about him asking to go to the toilet or even had a communication plan, we just put him on the potty for long periods of time (20 minutes) about 30-60 minutes after he'd had something to eat and drink.  If we got success we made a big fuss about him and celebrated! For awhile we got lots of success and I still sat him on the potty while I went toilet and 'modelled' how it was done.  Then all of a sudden he stopped going on the potty and for a whole month we got no success.  Then one day I decided to try him on the toilet and bingo! he went! It was then I realised all my modelling had given him the idea that was where you went toilet, not on a potty.  So from then onwards he was toileted.  However, our son was getting big, and heavy, but he didn't have good trunk control back then so it was difficult to keep him comfortable on the toilet and safe.  So we opted for morning and night time toileting with the odd lunch stop as well.
When he started at a special preschool (Conductive Education) they started a toileting program with him and it was there we decided he needed to be able to tell us when he needed to go.  So we started with a basic card (you can see the picture we used above) and everytime he was taken to the toilet we would touch the card and say 'Toilet', we hoped he would learn to associate the card with the intention/concept.

Toileting Setback - Hip Dysplasia Surgery

Hip Spica Cast - Part One - 2011

Back in late 2010 when we were all reeling from the Canterbury 7.1 Mag earthquake we also got the news that our son had been walking with a dislocated left leg.  He was then scheduled for hip reconstruction and 3 months in a Hip Spica cast in early 2011.  He underwent very major surgery and ended up in a broomstick hip cast (see picture to the right).  During that time it was very unwieldy to toilet him but we managed it off and on by holding him on the toilet supported at the cast.  We got some modicum of success.  Alas this was a setback for more than just toileting so we abandoned anything formal as we just got on with recovering from both the 2010 & 2011 Earthquakes and his hip surgery.  When he came out of cast in Mid 2011 we again started gently working on his toileting, nothing major just morning and night-times.  Fast forward to summer 2011-12 and I put him in undies and spent a few weeks over the summer holidays trying unsuccessfully to toilet train him.

What were the problems?

We had to accept the fact there were a few problems with this whole toileting process.  Namely the following:

  • He had no way of telling us he needed to go toilet
  • He couldn't physically get to the toilet himself
  • He didn't appear to be aware of his bladder
  • He suffered from constipation as a side effect of his surgery
So we had to tackle those as time went on.  These are still issues years later in 2015 we have still not resolved.  He again dislocated another leg, this time the right hip, and needed another hip surgery and 3 months in a hip cast in early 2013. So any progress we may have made with him being aware of his toileting needs were again dashed as he had to get used to going in a nappy all over again!
Hip Spica Cast - Part 2 - November 2013


What Methods Have We Tried?

Over the years we have been given many ideas, methods, theories etc on how best to teach our son to be aware of how to toilet.  From pouring water over his privates as he sits on the toilet, to wearing undies within a nappy, to letting him sit in wet undies in the hopes he won't like how it feels.  But all were failures, he just didn't seem to be aware of needing to go the toilet.  By now we had 99% success with solids on the toilet and he was also using the iPad to request tentatively that he needed to go.  However, getting him to just urinate on the toilet was proving to be a hassle.  We were able to get him sitting comfortably on the toilet, his torso control was good and balance stable.  He was doing lovely standing holding onto a rail by the toilet so we could assist with trousers and nappy down and onto the toilet.  He was still struggling with ongoing constipation but medication was helping with that.  So heres a list of what we've tried and how successful its been or not been:

  • 'feel wet' toilet training undies - they just got wet, he never seemed to get it
  • reusable nappies (PUL+Microfleece - homemade) - they leaked, he needed changing, he didn't mind being wet
  • Undies + scheduled time on the toilet - he would wee in the undies 5 minutes after being taken off the toilet, he never cared if he was wet
  • wetting the privates - made him irritable and never made him wee
  • running the tap while hes on the toilet - nothing there either
  • Putting a tissue in his nappy or a strip of cotton fabric so he would feel wet - didn't bug him
  • Undies and then a nappy over the top to catch any wees - similar to previous option - nothing
  • Reward Charts and stickers for success - an excellent way of tracking successes but he never understood the concept of the rewards
  • Water sensor placed in undies that played a tune when wet - terrified the poor guy!
  • Trainer undies with a soaker pad - leaked, he never noticed he was wet 
  • Scheduled toilet times - within an hour of a drink - mixed success, he appears to have some bladder control

Where to from here?

Well we're still working on that, scheduled times have been the most successful, along with modelling concepts (e.g. an adult going toilet and explaining while he watches on), and expectation that he will go at specific times.  Its been tricky to work out how soon after a drink or meal he will go toilet and to get the right timing, often he has been or will go quicker than I think.  But then other times I will take him and nothing will happen despite leaving him on toilet for 10 minutes.  But within 5 minutes of coming off the toilet he will go.  I don't believe he has too much awareness of his bladder but he does have awareness of going wees.  He does like the reward of us making a fuss and saying how great he is when he succeeds so thats helpful.
Continuing to model 'I need to go to the toilet' on his iPad has also proven useful.  He is now requesting to go even if hes not successful.  We are 50/50 successful these days.

I read this great blog entry http://bloomwhereheplantsyou.com/2013/01/diy-pull-ups/ about making your own pull-ups using sanitary pads with trainer undies and we are now trying that, undies he has helped choose and a Poise Extra Plus pad put in.  He is given the option of that or a pull-up nappy and he invariably chooses the underwear option.  The big bonus for us so far has been him showing awareness he has gone in the pad.  Everytime he has gone in the pad he has requested to go the toilet straight after so we can change it.  Just tonight he requested to go to the toilet and when placed on it he finally went wees successfully.  We have tried so many different ideas over the years but this fledgling success is promising.  We'll keep you posted on how this all goes. 

If you like us are finding teaching a special needs child how to toilet take heart, you're not alone!

thanks for reading my blog 

Vivien

Sunday, 24 May 2015

Clothing for Special Needs Kids - Adapt or Struggle

This is a bit off the topic of my usual Blog entries but I know one that will resonate with a lot of parents of SN kid out there.  If you have a kid with physical disabilities you often need to struggle with dressing them especially if they use a wheelchair a lot of the time.  This problem is not unique in the physically disabled community, even adults have trouble getting easily into and out of clothing and having it comfortably fit when you use a wheelchair.
Adding a snap crotch to a tshirt adapted for a child
(you can find my tutorial on upcycling tshirts to make these in the links below) 

There are many other problems with clothing that SN kids need help with, especially once they get older and the ability to have the features that were readily available when they were little (snap crotch closure say on tops) are almost non-existant or expensive to come across.  So being of the crafty persuasion I have often made things and adapted things to work.

I have used many a blog or tutorial to create clothing and adapt it for my son over the years.  I currently make swim nappies, bibs, bandanas, sometimes rompers and onesies, and even a waterproof cape for wearing when its wet. Along with this has been scouring the internet for advice and/or patterns.  With that has come some great resources.  So I thought I would share them with you all in case you too have a need for your child!

LINKS: Adapting Clothing or Buying Adapted Clothing for your Child: 


Monday, 6 April 2015

More Links to help you start AAC Modelling 


Hi All, when we are first starting out with using iPads, Low Tech Choice Boards or other means to get our children to communicate it can be really daunting on 'breaking through' that communication barrier.  We might get success with simple motivating choices but often its like groundhog day with those choices being ALL they will use because they have been successful with them.  However, how do you progress?  How do you get past just requesting set items, like FOOD or DRINK?
Well recently another parent posted links on a Facebook group I am on and I thought I would share those links about Modelling and AAC (Augmentative Communication).  Feel free to ask questions regarding modelling and starting communication with your child.  I will do my best to help you! Remember we're all different and so are our kids!


Cheers, Vivien

Thursday, 26 March 2015

How do I get them to Understand Communication?

Hi All

I have been having a lot of thought lately (& discussions) about getting kids past that hurdle of understanding.  Reading my blog might give others the impression it was easy for us, and somewhat miraculous and years down the track it almost seems even to us that it is!
It helps to have a motivated child who is keen on learning and receptive to what they are being given and shown.  Perhaps now at almost 8 years old our son seems to be that way.  However, that wasn't always the case.
He complained, he refused to look, he wouldn't let you redirect his hands, he wouldn't even engage with the iPad originally and certainly didn't have the fine motor skills to manage it.  He has astigmatism and won't use his glasses so his eyesight isn't the best either.  These are all factors that go against his being successful with ANY form of communication.  For years we just got grumps and passive acceptance of whatever he was given, he just learnt to be Ok with whatever was going on and we had a lot of bad behaviour formed out of frustration.  We always gave him Marmite on toast but when he learnt to communicate we learned he actually loved Honey which was why he tended to throw away his toast and not eat it!
At the beginning I totally expected my son to 'see' and understand the pictures he was given, to associate that a picture of cheese was actually cheese.  But somehow he didn't get it, I could tell him that the photo I was showing him was cheese and he would be happy with that, he would accept that it was cheese even though he knew it wasn't edible and totally wasn't cheese, it was just a PHOTO of cheese.  Herein lies the problem, we as parents and adults know that a photo of cheese, is just a photo of cheese, we know that we can go into the fridge and get some cheese and cut a piece (or unwrap a piece) of said cheese.  Your child knows you have cheese somewhere, probably in the fridge and they know a bit of complaining and maybe even fussing at the fridge will make you guess they need or want some cheese.  Maybe every morning tea they get cheese and they look forward to that special time the cheese miraculously arrives in front of them.  However one morning you don't give them cheese you decide on a piece of apple instead.  But they wanted cheese! Ensuing complaining and behaviours start.  We don't get it, they love apple, but suddenly they are upset! If ONLY they could tell us what the problem was, maybe they're sick? tired?  Did we say something wrong? Who knows?
We might try signing, trying to ask lots of questions and add to the kids confusion.
This is the scenario we are faced with, so we maybe with the help of an SLT create a bunch of PCCs (Picture Communication Cards) or PCS.  Usually they are large photos of desirable items, like cheese.  We encourage our kids to look at these photos, we explain they are cheese, we expect them to get it, and we feel defeated after weeks of showing them the photo of cheese, telling them its cheese and they refuse to touch it appropriately in order to get cheese.  When we test them by showing them a picture of socks and a picture of cheese they happily touch the socks photo and expect to get cheese.  We suddenly realise our kids didn't really understand the photos and we wonder if they are as smart as we think they are if they continually choose socks instead of the cheese photo.

Well I am about to shock you...STOP RIGHT THERE!!

I've been there too, its disheartening, its confusing, bewildering and causes you to re-evaluate everything you think, do and expect.  You can completely give up and think your child will never get it.  THEY WILL AND THEY DID....
Something I found was that the SLT's never mentioned the obvious.  Your child DID get what you were trying to get them to do, they DID communicate.  They may not have chosen the right card but they DID CHOOSE.  What you did was Step one in a long process, you got them to understand what was expected in this communication journey.  They learnt that in order to get what they wanted (whatever it was) they had to touch a CARD to get it.  That is enormous! That is communication! That is progress.  So DON'T feel defeated, don't think your kid is stupid, because they are not.  They got what you were trying to show them.  If they do something like touch a card (or an ipad button) they get something they want.  You have just shaped a behaviour.  It doesn't matter what is on the card, or the button, right now they don't really understand whats on that card or button.  They understand the concept of doing something to get something else, and thats what we want.
Phase 1 of PECs training is all about shaping behaviour to get a desired result, all that phase is after is getting the child to hand over a card in order to get something.  It really doesn't matter WHAT is on that card, it could be anything from a word, to a picture to a colour to anything you feel like.  You are teaching them a process first, picture recognition comes later.

We have had to reset before and go backwards and not use cards too, and we still do to some degree use physical objects for choice making.  We will often show a banana and a yoghurt say and get him to choose between them by handing us the one he wants.  Thats still a useful communication tool.  Thats still a choice.  In the early days we often at breakfast had two cards in front of him (FOOD and DRINK) and just out of his reach was his weetbix bowl and a drink of milk.  Both cards sat in front of those items and we would point at the cards and then at the physical options and say slowly and calmly what each item was.  He would reach for the weetbix and we would gently push his hand down to the FOOD card and say 'FOOD'.  He often wouldn't look and would again reach for the bowl and maybe start to vocalise angrily.  We would then hold the card up and say 'FOOD' again and then hold the bowl up and again say 'FOOD'.  He would just continually reach for his bowl and complain getting quite teary.  It took a LONG time to shape behaviour into touching a card and get past the tears and frustration.  Many times we wanted to give up and didn't think he would ever get it.  We have discovered with many things with our son that everything TAKES TIME.  I really wish there was an express train to training but there isn't.  At the beginning don't expect your child to understand the symbols, photos or whatever you are using.  Get them instead to step one, understanding if they want something they need to first do something for you.  Shape that behaviour and you have success.  Eventually you can teach them the point of each card.  You need to first motivate them to communicate and to want to do something for you so you can do something for them.  Find what their motivation is, a favourite toy, a DVD they love, some food or drink they MUST have, a trip to the park.  Whatever it is, you need to say to them 'Well if you want this then you need to do this for me first'.  They will get it quickly, trust me.  But whatever you do it must be a positive and successful experience, don't set yourself and them to fail.  If you are offering them cheese then have it ready to give straight away, no fussing, no going to the fridge, no going to cut it or otherwise.  If you're setting up the environment for success have the object nearby to associate with.  In the case of the park you might drive there in the car and then point at it and a picture in your hand and ask them to touch the card before then getting out of the car and going to the park.  If they don't touch the card you might instead drive off up the road and try again.  Focus on the learning on days your doing that, don't be distracted by other things or the child will learn that the phone ringing or a sibling being involved is all part of the process and will expect the phone to ring before they touch a card and get what they want.  Kids are literal.  They learn process.  If one time they were successful in getting what they wanted but the phone rang in the middle of it or you spoke to their sibling to get the item, you may find they refuse to do the same thing a different day and wait passively or don't engage because they are waiting for the phone to ring or the sibling to arrive to start the whole process.  Try and make it a quiet time with little distraction, I know how easy that sounds when I only have one child, but for the beginning process its what you have to do.  ANY distraction will ruin yours and their success.

Take heart, it does seem a tough road but once you break through you can quickly leave that behind.

GOOD LUCK!

PS> heres a great link discussing Teaching using repetition: http://www.autismmind.com/Teaching_Strategies_srk/Repetition_cnk/

Thursday, 26 February 2015

How Do I get This Kid to Communicate - Part 3 - Using our iPad to Communicate

Using his Choice Board clipped to
an acrylic stand
 Hi All, Well I thought it was about time to talk about how we got lucky and our son started to use his iPad to communicate.  It was a LONG process that we thought would NEVER happen.  I have thought at length on just HOW he started to use the iPad to actually talk and choose items.  What was it that finally worked?  What did we do?  What was the miraculous thing that made it all happen?
I wish I could say I had an answer for that, but alas, I don't.  Thinking back over it I suppose there was a lot of different things that all culminated with success.  Some of it was the low tech PECs training and choice boards, some of it was the early AAC Apps like Talking Cards being used and modelled, and some of it was pure luck and him being ready.

The 'AHA!' Moment

One day about 2 years ago we were all sitting around the table after having breakfast, our son was happily mucking about with his iPad as he often did going in and out of Apps just checking out what they all were and what they did.  He had been randomly going into the 'Talking Cards' app off and on and just listening to what each button said and we had learnt to ignore most of this exploring.
 We figured it wouldn't hurt him to just explore rather than us model or force him to use it. Up until this point he had never really initiated any choosing on the iPad using his App.  It was all forced choosing with us modelling and hand over hand button touching to get the correct answer and then be given what he had requested.  He seemed to understand it but never get the point and wouldn't really try without being 'made' to do it.  He was pretty passive and would only use his PECs Choice Placemat to choose anything.  By this time those placemats had started to get flung and he was obviously over those too.  But back to our original tale...

This particular morning he was quite interested in the AAC App, randomly listening to what each button said and trying them out.  When he started tapping 'BALL' we looked at him and said 'Ball? Ok, I'll get one for you'.  He looked stunned and watched us go out of the dining room.  I duly came back with a ball and sat there playing with it expectantly.  He got a little agitated and vocalised, but we ignored him.  I asked him to repeat what he'd said on the App and he looked confused.  I then told him if he wanted the ball he needed to ask with his iPad.  He looked at the iPad, looked at us, then complained vocally again.  I looked at hubby and said 'Would you like the BALL?', he said 'Yes, I would like the BALL'.  So I passed it to him.  I then signed Ball and asked for it back.  We did this for a few minutes with our son getting most annoyed.  I pointed to his iPad each time and said 'Ask for the BALL'.  He eventually touched the button again and we said 'Great! heres the ball'.  His face flooded with that expression we all know as 'OH! I get it'.  Suddenly it dawned on him what had happened and he was very excited.  I asked for the ball back and he gave it to me.  Then I played with it for a bit and he again hit the 'BALL' button and I gave it to him and said 'Yes, you can have the BALL'.  We did this back and forth for a few more minutes and he was SO excited.
Using his iPad whilst in
 his Hip Spica Cast
That was our big breakthrough.  We were on school holidays he was trapped again in a hip Spica cast thanks to another hip surgery and couldn't do much but we had something we could work on.  It was from then on that his use of AAC on the iPad just took off.

Talking Cards to Proloquo2Go

We started to add extra buttons and choices to Talking Cards as his level of choosing and wanting to use the iPad to choose got better and more consistent.  All through those 6 weeks of the school holidays he got better and better.  We were using it mostly to choose food items, but he also used it to choose what he wanted to watch on TV, where he wanted to go to, for a walk, to the park, for a swing or even to the swimming pool.  He really started to enjoy using the iPad to control things and he became empowered quite quickly.  The lovely thing about it all was his frustration levels went down as he was finally able to say that he really preferred honey on his toast not jam! (this was by constantly asking for honey when asked if he wanted jam on his toast).
Then school holidays finished and he returned to school. We sent along the iPad but never told school that he was using it to communicate, his teachers and aides continued to use his Choice Book which was a series of pages within an A5 Flip Book. After a few weeks of school we admitted that our son was using the iPad to choose at home and that he was rather good at it.  The School SLT was amazed as were all his teachers.  When they saw just how good, they then encouraged and expected him to use it to choose and converse.
Our Talking Cards Folders
However, Talking Cards was really limiting, no matter how much I tried to setup the varying folders with useful buttons it really wasn't setup for an emerging communicator like our Son.  I started to research AAC usage and read a LOT of blogs, webpages, joined facebook groups and generally upskilled myself on HOW to setup AAC Apps for basic communication.  Both myself and the School SLT realised quite quickly that his Talking Cards App was never going to work for long.
So I downloaded and setup ' Sounding Board'.

Here's another disclaimer: in a previous life I used to be a Senior Microsoft Computer Engineer and a both a DBase & Web Programmer, so I am comfortable with technology.  Configuring Sounding Board and setting up a flowing AAC App of choices and folders was quite my cup of tea and I found it easy.  Therefore I don't suggest you do this unless you feel confident you can.  Its an excellent free App, and if you can set it up with a series of folders and get it to work for you, go ahead and do it.
For a few weeks it worked really well, but if we needed to add more buttons to his folders often Sounding Board would break and I would have to recreate the folders all over again.  I could never get a good resolution from Ablenet the developers of Sounding Board so I had to regroup and think of another App that would do the job.
Sounding Board Main Page setup (the arrows show links to other pages)

By now I had to been researching on the web for a LONG time and knew of a few Apps, had seen YouTube videos, knew the costs and was aware of AAC apps that may help.  But right now our Son was keen on the way I had setup things and we really didn't want to blow all that work.  By now he had been using his iPad to 'talk' for about 6 months. So what AAC app could we use that we could setup to be like his current AAC apps?  From what I could tell the NZ$300 App Proloquo2go was the best option. But it was expensive.  So we waited until iTunes Cards were having a 25% off sale.  We brought enough iTunes $50 cards to make up $300 and brought Proloquo2go essentially for sale! Well at least with a 25% discount!


On the Proloquo2go Journey we go...  


I then spent a few long nights watching Assistiveware Video Tutorials and I went with a Basic Communication user first off with standard folders.  I started to modify that setup quite quickly to look much like his Talking Cards setup and have the same sort of flow as Sounding Board. So despite installing Proloquo2go I never used it configured 'out of the box' and instead attempted to create a system that 'flowed' easily for him.  A sort of  'mind map' based on how I thought he might make sentences, and from the experiences we were already having with him.  Not once did I think that far ahead in my design of the folders or buttons. For some time this setup really worked, it was based on what he was saying right then, and he loved it
 because it was getting him what he WANTED.  I never really understood language acquisition and certainly not in relation to my son.  I didn't really know what he knew and what he didn't.  His iPad communication was proving he knew and understood a lot.  Here was our conundrum, we had it setup to provide 'sentence starters'.  The most often used folders were 'I WANT', and 'FOOD'.  In the FOOD folder I had it set based on eating times, so food items were grouped in BREAKFAST, LUNCH, DINNER and SNACKS.  Over time I needed to add in Core Words so he could start to enlarge his vocabulary.  This is when we hit problems, he had always had some core words thrown in there, his top line of his setup always had YES, NO, MORE and FINISHED.  Obviously I WANT was core words too, but he wasn't using them in context he was using them because I had 'made' him use them in order to get to where he wanted to be, which was often eating Munchos or cheese!
The School SLT was asking us to include more Core Words and we needed to start adding them in.  So cue more long nights watching videos, reading blogs, and getting on the Proloquo2go parents FB group.  Its here I think I will leave this blog entry as its another story in itself how we progressed Proloquo2go and added core words into his vocabulary.  Believe it or not our story as you have read it so far still has about 2-3 more chapters to go!

Thanks for reading my blog and stay tuned for the CORE WORD CONUNDRUM!
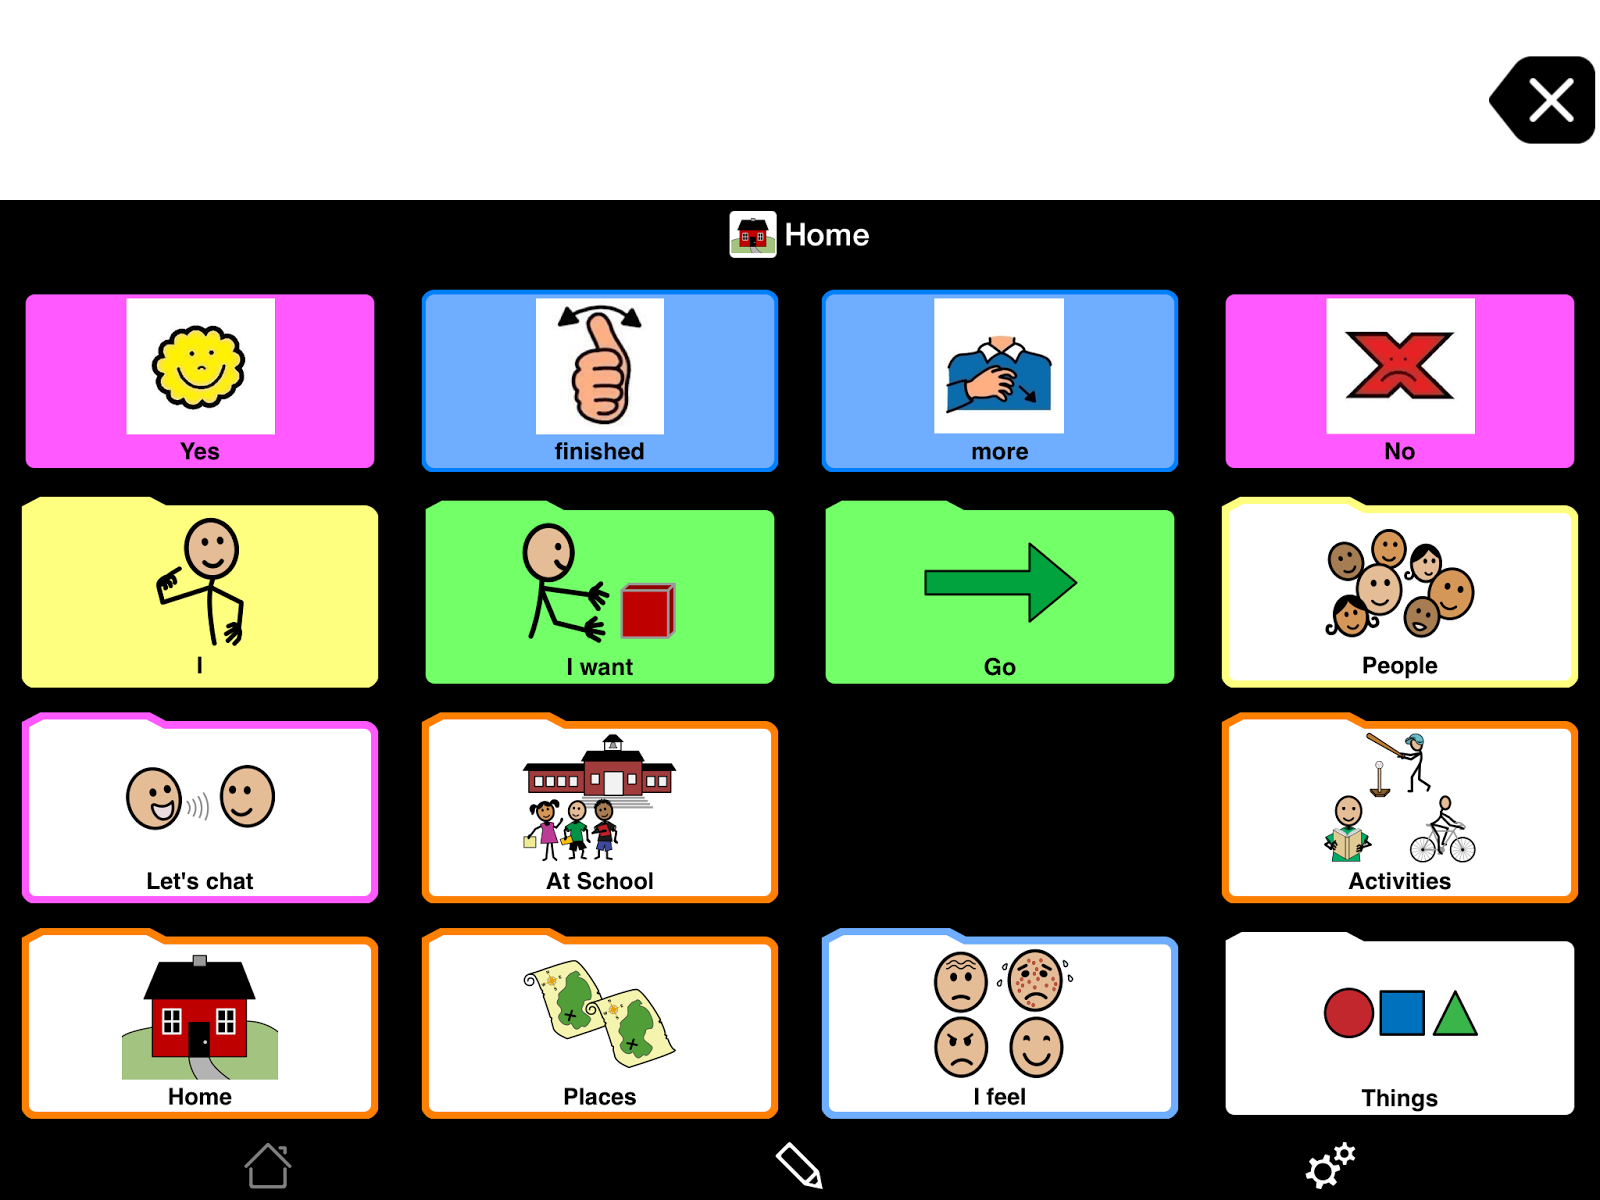
This is a slightly advanced version of our original Proloquo2go home page.  You'll see how each folder is basically a 'sentence starter'.  If he touched 'I WANT', it would speak that to the sentence strip you see above all the buttons, he could then touch FOOD folder, and in that folder a SNACKS Folder, and in there CHEESE.  The sentence Strip would then have 'I WANT CHEESE' on it and he could push the strip to say that sentence out loud.