I have decided to practice my new skill of pattern drafting and thought others may find it of use too. There is plenty of tutorials out there that show you how to draft a pattern from a favourite well fitting tshirt. But my tutorial is a little different. Its how to draft a Tshirt using a template of measurements. This tutorial shows you how to draft a Size 134cm (8-10 years) Boys loose fit tshirt with short sleeves. I intend to follow up this post with a how to sew and how to adapt the pattern as time allows. But if you ever wanted to make your son a tshirt and wanted a free pattern well try this!
What you'll need:
- Paper - quite a wide piece you can use lunchwrap like I did or A3 sketch paper or you could use a piece of newspaper or even sellotape together a bunch of printer paper - your choice! It just needs to be wide enough and long enough.
- A long ruler - I used a 40cm long clear ruler but you may need to have a measuring tape for the longer measurements
- Pen or Pencils - to sketch the lines - up to you if you use different colours for the lines and markers
A Drafting we will go:
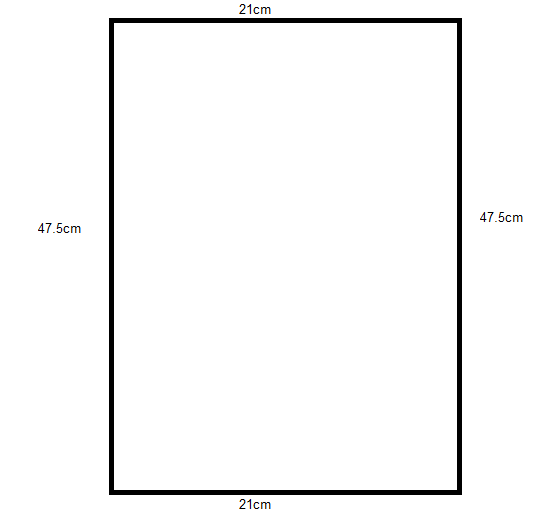
Step 1:
Draw a rectangle on your paper similar to the one in the picture. Measure 21cm across the top, 47.5cm down one side and the other and close the rectangle with another 21cm line.
Step 2:
 Following the diagram make markers along the top line at 4cm, 9.5cm from the left corner and at 6.5cm and 2cm from the right hand corner. Down the left hand side make a marker at 2cm, 7.5cm, and 20cm. On the right hand side place markers at 3cm and 20cm. Join the two 20cm markers with a line across the rectangle.
Step 3:
Using the same diagram measure across from the left hand 7.5cm marker measure across a line 9.5cm long and from the top 9.5cm marker measure a 7.5cm line that joins to the previous line. This will be the rectangle that helps you make the curve for the front neckline.
Step 4:

Draw a curve like the one shown in the diagram from the left hand 7.5cm marker to the 9.5cm marker on the top line. The lines you drew in step 3 should assist you in making the curve. From the 6.5cm marker on the top line measure down 1.5cm and place a marker. At the 2cm marker on the top line measure down 3cm and place a marker. Measure across from the right hand lines 12cm marker and put in a marker. At the 20cm line measure across 2cm and put a marker draw a line that intersects all those markers from the top line to the 20cm line (the green line in the diagram). At the 12cm+2cm marker measure across a further 2cm and place a marker. Using the top 2cm marker the line you drew down and the 2cm marker you just made draw a curve that goes from the 2cm marker to the 20cm marker bending in to meet the 12cm+2cm marker as in the diagram. In order to make the shoulder line measure across from the left hand top 9.5cm marker down towards the right hand 2cm marker but angled down 2cm insersecting the 1.5cm measurement measured down from the top lines 6.5cm marker.
Step 5:
 For the final curve (the back neckline) you need to measure down 2cm from the top lines 4cm marker. Join with a curve the left hand sides 2cm marker and the top lines 9.5cm marker curving under the 2cm marker you just made at 4cm. Mark the left hand line with "FOLD" this will be the centre fold line when you cut the pattern out.
Finishing off!
To finish off you can retrace the pattern to make a back and front pattern or when you cut out the pattern just trim off to the lower neckline for the front.
You have now drafted a front and back Tshirt pattern! This pattern (without the sleeves - which will be in another post) can be used to sew up a singlet for your young man as well. Stay tuned for Part two - drafting a short sleeve for your tshirt.
thanks for reading my tutorial/DRAFT-A-LONG!
Vivien
No comments:
Post a Comment